How to test the device
If one of your radiators is not heating up, there are a number of possible reasons which could be responsible, some of which are part of the Genius Hub system. The following procedure will help you to determine if the Genius Radiator Valve is at fault.
Testing the Genius Radiator Valve (DA-WRV-E)
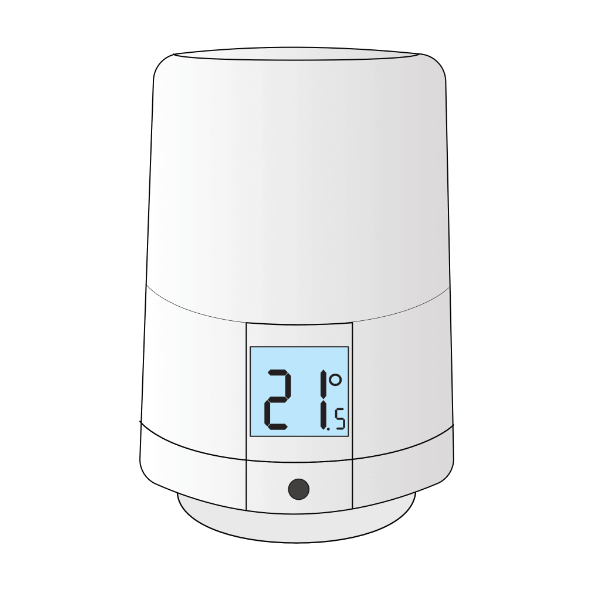
Confirming the Genius Radiator Valve has power
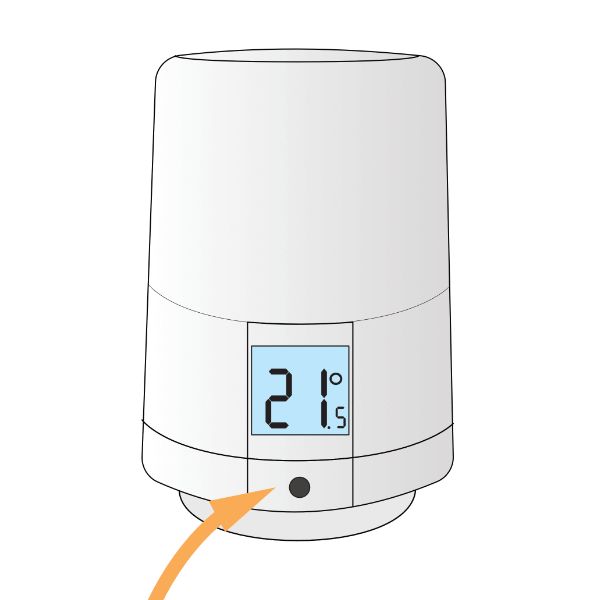
- Go to the Genius Radiator Valve in question and press the button on the front of the device. Look at the screen to see if it lights up
If it does not light up, then the batteries have died in the device and need to be replaced. If you go to the app, and click on the 'Issues' tile, selecting the device in question it will guide you through how to change the 2 x AA batteries in the device.
Note the orientation of the batteries as they are placed into the device.
- If the Genius Radiator Valve does not light up when pressed after the batteries have been changed, it has developed a hardware fault and will need to be replaced.
- If the device does light up, look at the screen and find the scenario below which matches the device:
- E8 is displayed on the Genius Radiator Valve
- An error other than E8 is displayed on the Genius Radiator Valve
- The backlight rapidly flashes
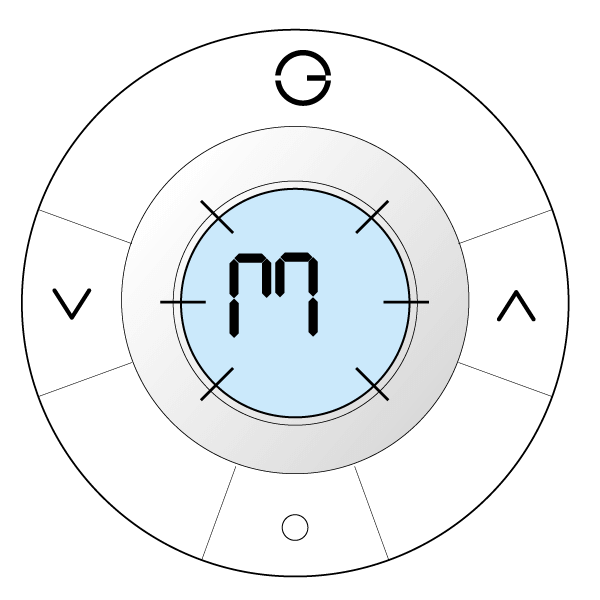
- A solid 'M' is displayed on the screen
- A flashing 'M' is displayed on the screen
- A temperature of between 4-28 is displayed
There is E8 displayed on the screen
- This is a temporary communication error, where by the Genius Radiator Valve has been unable to communicate with the Genius Hub for at least 30 minutes
- This article explains how to fix the problem.
A non-E8 error is displayed on the screen
- This is a permanent hardware fault on the Genius Radiator Valve and it will need to be replaced.
- This article explains the error messages in more detail.
The backlight rapidly flashes
- The Genius Radiator Valve has lost connection to the Genius Hub and needs to be re-added.
- This article explains how to fix the problem.
A solid 'M' is displayed on the screen
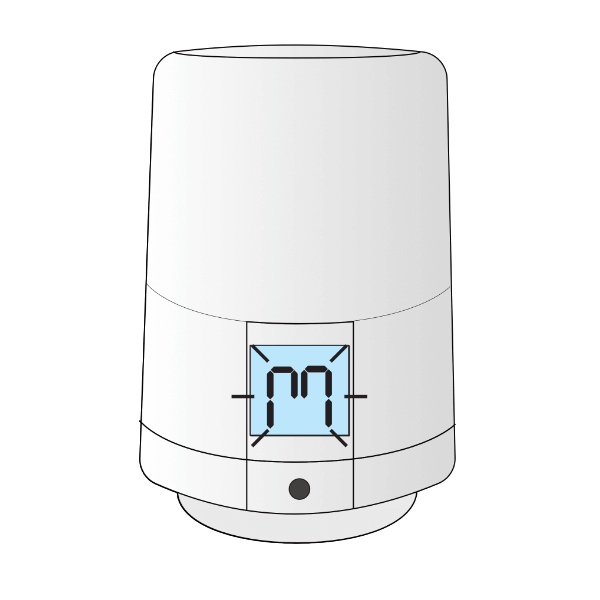
- If you woke up the Genius Radiator Valve by pressing the button, then you have selected the menu. Leave the Genius Radiator Valve for 30 seconds and quickly press the button again. You should now see a temperature on the screen.
- If you didn't interact with the device, or rotated the top, it is stuck on the menu.
- First remove and replace the one of the batteries in the device. If it has merely frozen, this will clear the problem.
- If the device continues to show the 'M' symbol on the device after the batteries have been replaced, the button is stuck 'down' and is repeatedly registering as a button press.
- To fix this, try to gently lever the button a small amount from the screen side (furthest from the out edge of the device). If successful, M will stop showing on the screen.
- If this does not fix it, and the device is within warranty, contact Genius Hub for a returns form.
A flashing 'M' is displayed on the screen
- If you woke up the Genius Radiator Valve by pressing the button, then you have put it into 'Mount Mode', where by it is no longer pressing down on the pin of the valve body, and so is allowing water to flow.
- To fix this, long press once on the button once more to take the valve out of Mount Mode. After 30 seconds quickly press the button, you should now see a temperature on the screen.
- If you pressed one of the side, arrow buttons to wake up the Genius Radiator Valve, it is stuck on the menu.
- First remove and replace the one of the batteries in the device. If it has merely frozen, this will clear the problem.
- If the device continues to show the 'M' symbol on the device after the batteries have been replaced, the button is stuck 'down' and is repeatedly registering as a button press.
- To fix this, try to gently lever the button a small amount from the screen side (furthest from the out edge of the device). If successful, M will stop showing on the screen.
- If this does not fix it, and the device is within warranty, contact Genius Hub for a returns form.
A temperature of between 4-28 is displayed
- The Genius Radiator Valve is currently controlling to a temperature. Run the following test from the app to see if the Genius Radiator Valve has good comms to the Genius Hub.
Confirming the Genius Radiator Valve is communicating
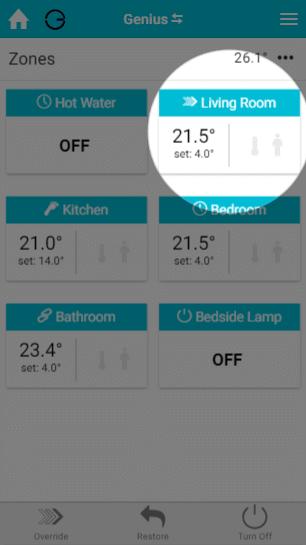
- Load up the My House page of the app.
- Check to see if there are any errors reported in the 'System' tile at the top of the screen.
- If so, look for the Genius Radiator Valve for this zone.
- If there is an error with this device, click on the error to be guided through how to fix it.
- If there are no errors, go to the radiator zone and override it to '5°C'.
- This should be a significant amount below the set temperature.
- The heating indicator for this zone should turn blue.
- Click on the Main Menu.
- Select 'Settings'.
- Choose 'Devices'.
- Locate your Genius Radiator Valve for this zone and click on the row to expand it. The setpoint should say 5°C.
- If it displays an arrow to 5°C, you will need to wake up the Genius Radiator Valve by pressing once on the button. The time since last communication should return to near 00:00 and the setpoint should update.
- The Genius Radiator Valve should now show 5°C on the screen if you wake it up.
- If the device does not say 5°C, click on the device submenu (•••) in the app and choose 'Configure'.
- Confirm that you want to proceed by pressing 'Configure'.
- Now click on the device submenu (•••) and choose 'Ping' and confirm this.
- Wake up the Genius Radiator Valve by pressing the button.
- The time since last communication should return to near 00:00 and the setpoint should say 5°C.
- Return to the My House page, and select the radiator zone once more.
- Override it to '28°C'.
- The heating indicator for this zone should turn orange.
- Click on the Main Menu.
- Select 'Settings'.
- Choose 'Devices'.
- Locate your Genius Radiator Valve for this zone and click on the row to expand it. The setpoint should say 28°C.
- If it displays an arrow to 28°C, you will need to wake up the Genius Radiator Valve by pressing once on the right )^) button. The time since last communication should return to near 00:00 and the setpoint should update.
- The Genius Radiator Valve should now show 4°C on the screen if you wake it up.
- If the device does not say 28°C, click on the device submenu (•••) in the app and choose 'Configure'.
- Confirm that you want to proceed by pressing 'Configure'.
- Now click on the device submenu (•••) and choose 'Ping' and confirm this.
- Wake up the Genius Radiator Valve by pressing the button.
- The time since last communication should return to near 00:00 and the setpoint should say 28°C.
- The fact that the Genius Radiator Valve displays 28°C, on the device and app shows that it is communicating correctly.
Confirming the Genius Radiator Valve can open/shut off the flow of water
- With the radiator zone overridden to 28°C, the zone orange on the app and the boiler running hot water should now start to flow around the system.
- Wait 10 minutes and go to the radiator in question and press the button. You should see 28°C on the screen of the device.
- Gently try to rotate the Genius Radiator Valve. The head should spin freely, but not leave the radiator.
- The Genius Radiator Valve has fully retracted the plunger and in turn the pin is now free for let water pass.
- If the Genius Radiator Valve is not turning freely, press the button once more and wait 10 minutes. It is possible the valve was asleep and has not had time to open yet.
- The radiator nearest the Genius Radiator Valve (and the pipe beneath) should now start to heat up.
Be careful when checking the radiator as it may be very hot and burn if due care is not taken.
If the Genius Radiator Valve is turning easily but the radiator is not heating up, either the hot water has not been pumped this far from the boiler, in which case waiting a few minutes longer will fix this; or the pin in the valve body underneath the Genius Radiator Valve has seized.
- The fact that the Genius Radiator Valve turns freely shows that it is working correctly.
- If the radiator is still not heating up, the seized pin will have to be freed or the valve body replaced. To try to free the pin, remove the valve head from the radiator, and with a pair of pliers or end of a large spanner, gently work the pin on the valve body free. Be careful when doing this as if the valve body is in poor condition, it may cause the valve body to leak. Once the pin is free, remount the valve head. See this link for removing and remounting the Genius Radiator Valve.
If it's not possible to free up the pin on the valve body, it will need to be replaced.
Testing the Genius Radiator Valve (DA-WRV-C)
Confirming the Genius Radiator Valve has power
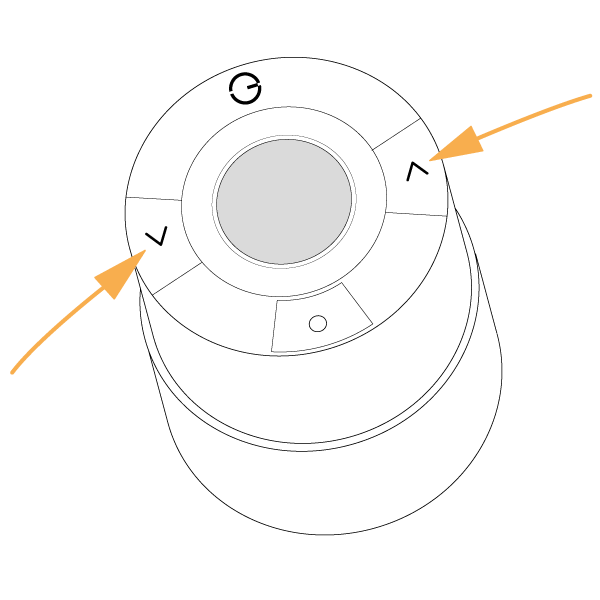
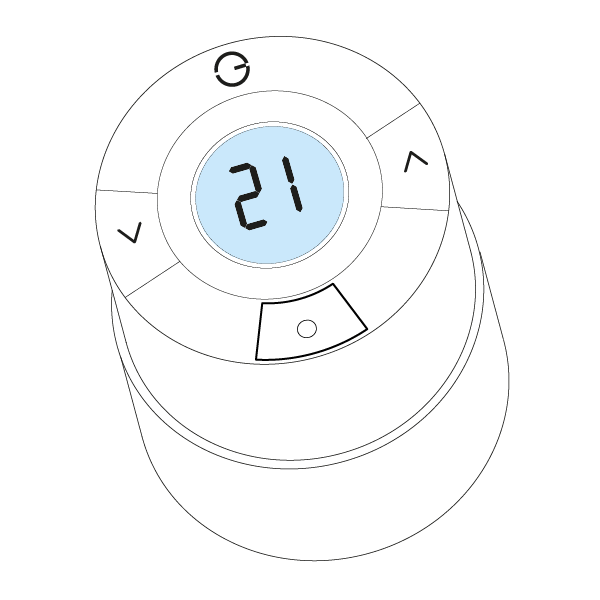
- Go to the Genius Radiator Valve in question and press one of the arrow buttons on the side of the device. Look at the screen to see if it lights up
If it does not light up, then the batteries have died in the device and need to be replaced. If you go to the app, and click on the 'Issues' tile, selecting the device in question it will guide you through how to change the 2 x AA batteries in the device.
Note the orientation of the batteries as they are placed into the device.
- If the Genius Radiator Valve does not light up when pressed after the batteries have been changed, it has developed a hardware fault and will need to be replaced.
- If the device does light up, look at the screen and find the scenario below which matches the device:
- E5 is displayed on the Genius Radiator Valve
- An error other than E5 is displayed on the Genius Radiator Valve
- The backlight rapidly flashes
- A solid 'M' is displayed on the screen
- A flashing 'M' is displayed on the screen
- A temperature of between 4-28 is displayed
There is E5 displayed on the screen
- This is a temporary communication error, where by the Genius Radiator Valve has been unable to communicate with the Genius Hub for at least 30 minutes
- This article explains how to fix the problem.
A non-E5 error is displayed on the screen
- This is a permanent hardware fault on the Genius Radiator Valve and it will need to be replaced.
- This article explains the error messages in more detail.
The backlight rapidly flashes
- The Genius Radiator Valve has lost connection to the Genius Hub and needs to be re-added.
- This article explains how to fix the problem.
A solid 'M' is displayed on the screen
- If you woke up the Genius Radiator Valve by pressing the middle /o\ button, then you have selected the menu. Leave the Genius Radiator Valve for 30 seconds and press one of the side buttons. You should now see a temperature on the screen.
- If you pressed one of the side, arrow buttons to wake up the Genius Radiator Valve, it is stuck on the menu.
- First remove and replace the one of the batteries in the device. If it has merely frozen, this will clear the problem.
- If the device continues to show the 'M' symbol on the device after the batteries have been replaced, the /o\ button is stuck 'down' and is repeatedly registering as a button press.
- To fix this, try to gently lever the button a small amount from the screen side (furthest from the out edge of the device). If successful, M will stop showing on the screen.
- If this does not fix it, and the device is within warranty, contact Genius Hub for a returns form.
A flashing 'M' is displayed on the screen
- If you woke up the Genius Radiator Valve by pressing the middle /o\ button, then you have put it into 'Mount Mode', where by it is no longer pressing down on the pin of the valve body, and so is allowing water to flow.
- To fix this, long press once on the middle button once more to take the valve out of Mount Mode. After 30 seconds press one of the side buttons, you should now see a temperature on the screen.
- If you pressed one of the side, arrow buttons to wake up the Genius Radiator Valve, it is stuck on the menu.
- First remove and replace the one of the batteries in the device. If it has merely frozen, this will clear the problem.
- If the device continues to show the 'M' symbol on the device after the batteries have been replaced, the /o\ button is stuck 'down' and is registering continually as a button press.
- To fix this, try to gently lever the button a small amount from the screen side (furthest from the out edge of the device). If successful, M will stop flashing on the screen.
- If this does not fix it, and the device is within warranty, contact Genius Hub for a returns form.
A temperature of between 4-28 is displayed
- The Genius Radiator Valve is currently controlling to a temperature. Run the following test from the app to see if the Genius Radiator Valve has good comms to the Genius Hub.
Confirming the Genius Radiator Valve is communicating
- Load up the My House page of the app.
- Check to see if there are any errors reported in the 'System' tile at the top of the screen.
- If so, look for the Genius Radiator Valve for this zone.
- If there is an error with this device, click on the error to be guided through how to fix it.
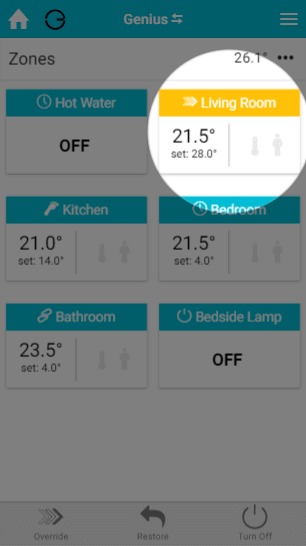
- If there are no errors, go to the radiator zone and override it to '4°C'.
- This should be a significant amount below the set temperature.
- The heating indicator for this zone should turn blue.
- Click on the Main Menu.
- Select 'Settings'.
- Choose 'Devices'.
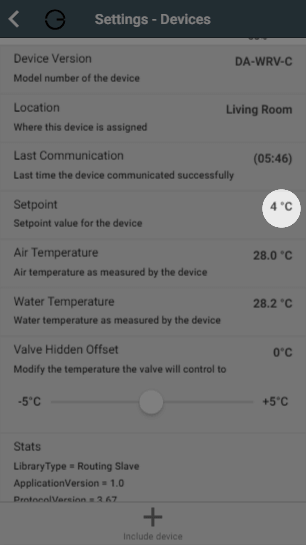
- Locate your Genius Radiator Valve for this zone and click on the row to expand it. The setpoint should say 4°C.
- If it displays an arrow to 4°C, you will need to wake up the Genius Radiator Valve by pressing once on the right )^) button. The time since last communication should return to near 00:00 and the setpoint should update.
- The Genius Radiator Valve should now show 4°C on the screen if you wake it up.
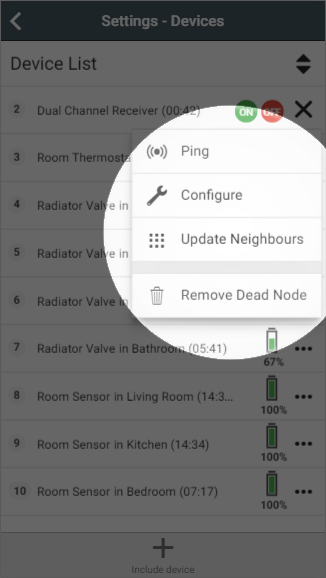
- If the device does not say 4°C, click on the device submenu (•••) in the app and choose 'Configure'.
- Confirm that you want to proceed by pressing 'Configure'.
- Now click on the device submenu (•••) and choose 'Ping' and confirm this.
- Wake up the Genius Radiator Valve by pressing the right )^) button.
- The time since last communication should return to near 00:00 and the setpoint should say 4°C.
- Return to the My House page, and select the radiator zone once more.
- Override it to '28°C'.
- The heating indicator for this zone should turn orange.
- Click on the Main Menu.
- Select 'Settings'.
- Choose 'Devices'.
- Locate your Genius Radiator Valve for this zone and click on the row to expand it. The setpoint should say 28°C.
- If it displays an arrow to 28°C, you will need to wake up the Genius Radiator Valve by pressing once on the right )^) button. The time since last communication should return to near 00:00 and the setpoint should update.
- The Genius Radiator Valve should now show 4°C on the screen if you wake it up.
- If the device does not say 28°C, click on the device submenu (•••) in the app and choose 'Configure'.
- Confirm that you want to proceed by pressing 'Configure'.
- Now click on the device submenu (•••) and choose 'Ping' and confirm this.
- Wake up the Genius Radiator Valve by pressing the right )^) button.
- The time since last communication should return to near 00:00 and the setpoint should say 28°C.
- The fact that the Genius Radiator Valve displays 28°C, on the device and app shows that it is communicating correctly.
Confirming the Genius Radiator Valve can open/shut off the flow of water
- With the radiator zone overridden to 28°C, the zone orange on the app and the boiler running hot water should now start to flow around the system.
- Wait 10 minutes and go to the radiator in question and press the right )^) button. You should see 28°C on the screen of the device.
- Gently try to rotate the Genius Radiator Valve. The head should spin freely, but not leave the radiator.
- The Genius Radiator Valve has fully retracted the plunger and in turn the pin is now free for let water pass.
- If the Genius Radiator Valve is not turning freely, press the right )^) button once more and wait 10 minutes. It is possible the valve was asleep and has not had time to open yet.
- The radiator nearest the Genius Radiator Valve (and the pipe beneath) should now start to heat up.
Be careful when checking the radiator as it may be very hot and burn if due care is not taken.
If the Genius Radiator Valve is turning easily but the radiator is not heating up, either the hot water has not been pumped this far from the boiler, in which case waiting a few minutes longer will fix this; or the pin in the valve body underneath the Genius Radiator Valve has seized.
- The fact that the Genius Radiator Valve turns freely shows that it is working correctly.
- If the radiator is still not heating up, the seized pin will have to be freed or the valve body replaced. To try to free the pin, remove the valve head from the radiator, and with a pair of pliers or end of a large spanner, gently work the pin on the valve body free. Be careful when doing this as if the valve body is in poor condition, it may cause the valve body to leak. Once the pin is free, remount the valve head. See this link for removing and remounting the Genius Radiator Valve.
If it's not possible to free up the pin on the valve body, it will need to be replaced.
Summary
If you have completed the tests above and the Genius Radiator Valve is communicating correctly and can control the flow of water through the radiator then this device is not at fault. Other possible articles of interest may be:
- This article which explains using an offset to ensure that the Genius Radiator Valve can control the radiator accurately.
- This article which tests that the boiler is being controlled correctly to supply hot water to the radiators.
- This article, the section titled 'Confirming the boiler controller is working'