
How to test the system
If one of your underfloor heating zones is not heating up, there are a number of possible reasons which could be responsible, some of which are part of the Genius Hub system. The following procedure will help you to determine which part of the system is not working.
Confirming the Temperature Sensing device is communicating
-
Go to the My House page.
-
Check to see if there are any errors reported in the 'System' tile at the top of the screen.
-
If so, look for the device which reports the room temperature for the underfloor heating. This is likely to be a Wireless Room Sensor or Room Thermostat (this article will assume a Room Thermostat going forwards, however the steps are equally applicable to a Wireless Room Sensor).
-
If there is an error with this device, click on the error to be guided through how to fix it.
-
-
If there are no errors, look at the underfloor heating zone, and confirm that a temperature is being displayed.
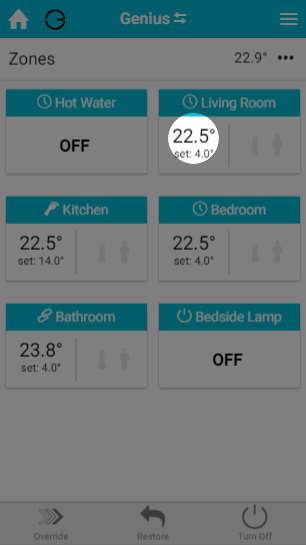
-
If no temperature is displayed, click on the Main Menu (found at the top-right of the app).
-
Tap 'Settings'.
-
Choose 'Devices'.
-
Scroll down to the Wireless Room Thermostat which is to control your underfloor heating and check that there is a temperature displayed by tapping on the Wireless Room Thermostat.
-
There should be a row displaying the 'Air Temperature'.
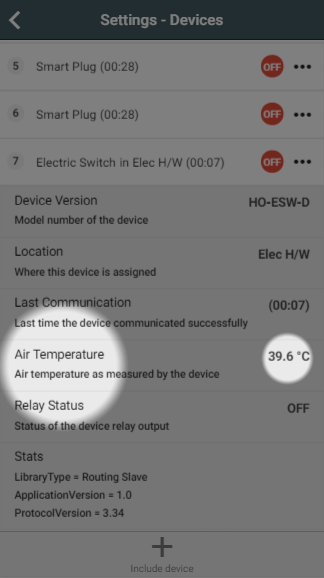
-
-
If a temperature is not being displayed for a Wireless Room Thermostat:
-
Click on the sub-menu (••• to the right of the device).
-
Click on 'Configure'.
-
When the Wireless Room Thermostat next communicates it will report the measured temperature (normally takes up to 10 minutes).
-
To speed this up, go to the Wireless Room Thermostat in question and press once on the 'up' arrow to wake the device.
-
-
If a temperature is displayed for the Wireless Room Thermostat but not in the underfloor heating zone, then the Wireless Room Thermostat needs to be assigned to the underfloor heating zone.
-
Go to the underfloor heating zone.
-
Click on the Zone Submenu (••• underneath the mode selector).
-
Choose 'Zone Setup'.
-
Click 'Assign Device' at the bottom of the screen.
-
Select the Wireless Room Thermostat, followed by 'Assign'.
-
-
A measured temperature should now appear for the zone. If you still have a problem with the underfloor heating, continue to the next steps.
Confirming the Electric Switch is communicating
The instructions below are for an Electric Switch, however your underfloor heating may also be controlled by a Single Channel Receiver or, in certain circumstances, a Dual Channel Receiver.
The notes will explain where this differs for testing.
-
Load up the My House page of the app.
-
Check to see if there are any errors reported in the 'System' tile at the top of the screen.
-
If so, look for the device which controls your underfloor heating, which is commonly an Electric Switch.
-
If there is an error with this device, click on the error to be guided through how to fix it.
-
-
If there are no errors, go to the underfloor heating zone and override it to a much lower temperature than the measured temperature.
-
The heating indicator for this zone should turn blue.
-
Click on the Main Menu.
-
Select 'Settings'.
-
Choose 'Devices'.
-
-
Locate your Electric Switch for the underfloor heating in this zone. The heating indicator should say 'OFF' and be in a red circle.
-
If the heating indicator is green then there is a problem with the communications to the Electric Switch.
-
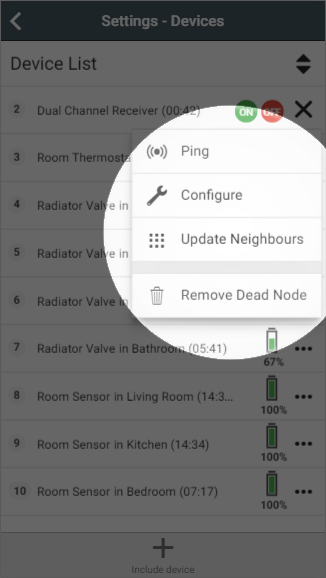
To fix this, click on the device submenu (•••) and choose 'Configure'.
-
Confirm that you want to proceed by pressing 'Configure'.
-
Now click on the device submenu (•••) and choose 'Ping' and confirm this.
-
The time since last communication should return to near 00:00 and the heating indicator should now turn red.
-
-
-
Return to the My House page, and select the underfloor heating zone once more.
-
Override it to a much higher temperature than the measured temperature.
-
The heating indicator for this zone should turn orange.
-
Click on the Main Menu.
-
Select 'Settings'.
-
Choose 'Devices'.
-
-
Locate your Electric Switch for the underfloor heating in this zone. The heating indicator should say 'ON' and be in a green circle.
-
If the heating indicator is red then there is a problem with the communications to the Electric Switch.
-
To fix this, click on the device submenu (•••) and choose 'Configure'.
-
Confirm that you want to proceed by pressing 'Configure'.
-
Now click on the device submenu (•••) and choose 'Ping' and confirm this.
-
The time since last communication should return to near 00:00 and the heating indicator should now turn green.
-
-
-
You have now confirmed whether or not your Electric Switch can communicate with your Genius Hub. If you still have a problem with the underfloor heating, go to the Electric Switch in your property and continue with the steps below.
Confirming the Electric Switch is working
-
With the underfloor heating zone still overridden to a much higher temperature, there should be a red light next to the 'HUB' label on the bottom-right of the Electric Switch.
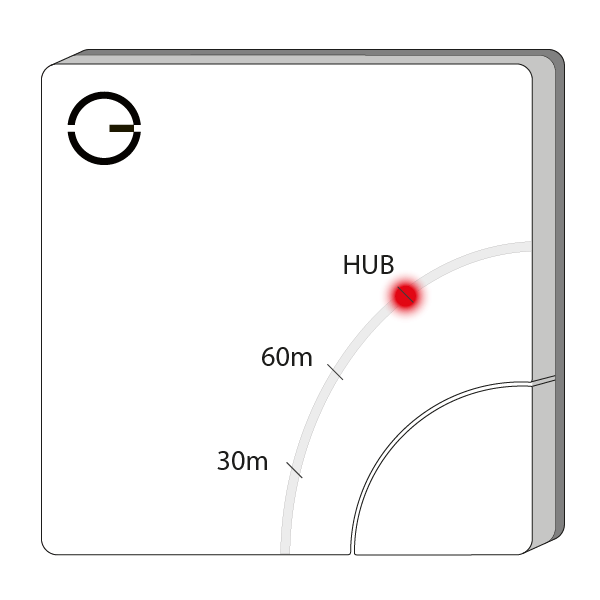
-
If you have a Dual Channel Receiver, read the labels on the inside of the door to find which white button controls the underfloor heating. Press the relevant white button and the light should turn green for a few seconds to confirm that the Dual Channel Receiver is calling for heat. If you have a Single Channel Receiver, a green light should appear on the front.
-
If the red light does not turn on (for the Single and Dual Channel Receivers, if the green light does not turn on) and you have not configured the device during this testing:
-
To fix this, click on the device submenu (•••) and choose 'Configure'.
-
Confirm that you want to proceed by pressing 'Configure'.
-
Now click on the device submenu (•••) and choose 'Ping' and confirm this.
-
The time since last communication should return to near 00:00.
-
The red light should now turn on. For a Dual Channel Receiver, press the same white button again and the light should turn green for a few seconds. For a Single Channel Receiver, the green light should now appear.
-
-
If the red light does not turn on (for the Single and Dual Channel Receivers, if the green light does not turn on) and you have configured the device during this testing:
-
See this article for re-adding the Electric Switch to your system.
-
See this article for re-adding the Dual Channel Receiver to your system.
-
See this article for re-adding the Single Channel Receiver to your system.
-
-
If no light is shown on the device at all, there is a power issue with the device. You should get a qualified plumber to look at and fix this.
-
-
If the red light illuminates on the Electric Switch, the relevant actuator(s) on the manifold should begin to open, the underfloor heating zone valve (if your system has one) should open and the boiler fire. This means the Electric Switch is now working correctly.
-
If the boiler is not running, carry on with the steps below.
-
-
To check the actuators are opening, go to the manifold and find those labelled for the room in question. Actuators normally have one of the following three indicators to show they are heating:
-
There is a clear panel on the side which has a line which moves up when heating.
-
There is a small plastic flag which stands proud when heating.
-
The top of the actuators lifts up when it is open.
-
If the actuators do not open after 15 minutes, there is a problem with the wiring between these and the Electric Switch. You should get a qualified plumber to look at and fix this.
-
If the actuators are open, your system does not have a zone valve and the boiler is not running, check the boiler for power, error codes and water pressure. You should get a qualified plumber to look at and fix this.
-
-
If your system has a zone valve, check it is working. Go to where the zone valves are located, this is normally next to the boiler. A zone valve is a silver metal box attached to a large brass valve in the pipework from the boiler, which has wires going to it. This opens and closes the flow of water around your system based on when there is a call for heat.
-
On the side of the zone valve should be a lever.
-
When you try to move the lever, if it is:
-
Difficult to move, then there is a problem with the zone valve or the wiring between the Electric Switch, underfloor heating wiring centre and zone valve. You should get a qualified plumber to look at and fix this.
-
Easy to move, then there is not a problem with the motor on the zone valve, but there is a problem wiring between zone valve and boiler, or a problem with the boiler. You should get a qualified plumber to look at and fix this. Alternatively, you may be able to see an error on the boiler which can be fixed, such as a loss of power, an error code or low water pressure.
-
-