
How to test the system
If one of your radiators is not heating up, there are a number of possible reasons which could be responsible, some of which are part of the Genius Hub system. The following procedure will help you to determine which part of the system is not working.
Confirming the Wireless Radiator Valve is communicating
-
Load up the My House page of the app.
-
Check to see if there are any errors reported in the 'System' tile at the top of the screen.
-
If so, look for the Wireless Radiator Valve for this zone.
-
If there is an error with this device, click on the error to be guided through how to fix it.
-
-
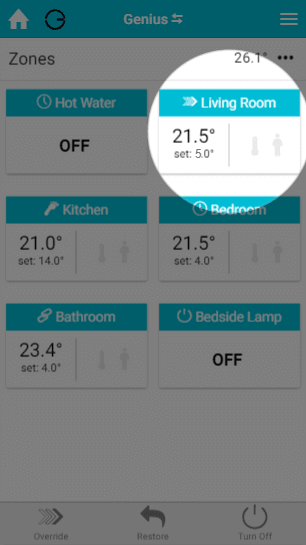
If there are no errors, go to the radiator zone and override it to '5°C'.
-
This should be a significant amount below the set temperature.
-
-
The heating indicator for this zone should turn blue.
-
Click on the Main Menu.
-
Select 'Settings'.
-
Choose 'Devices'.
-
-
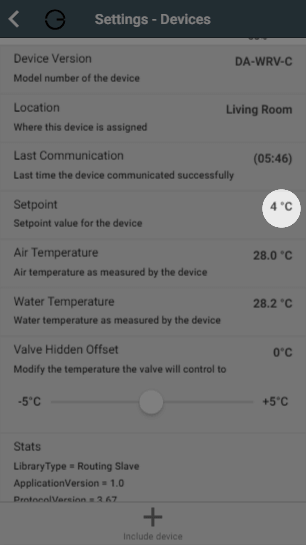
Locate your Wireless Radiator Valve for this zone and click on the row to expand it. The setpoint should say 5°C.
-
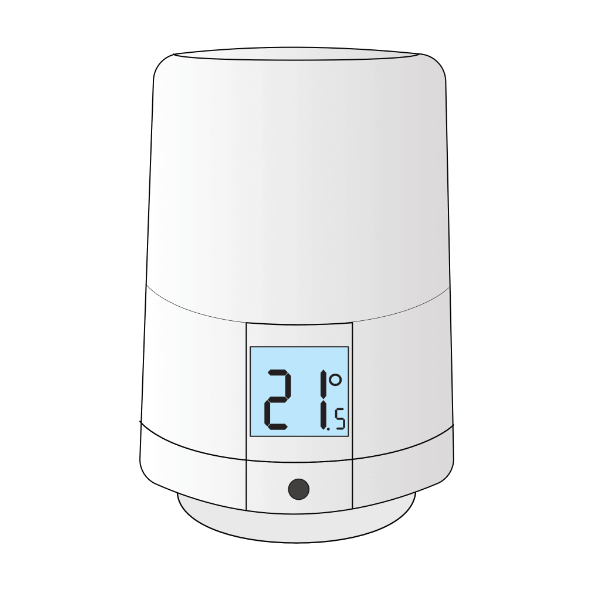
If it displays an arrow to 5°C, you will need to wake up the Wireless Radiator Valve by pressing the button underneath the screen once. The time since last communication should return to near 00:00 and the setpoint should update.
-
-
The Wireless Radiator Valve should now show 5°C on the screen if you wake it up.
-
If the screen is blank, check or replace the batteries. The Wireless Radiator Valve takes 2 x AA batteries.
-
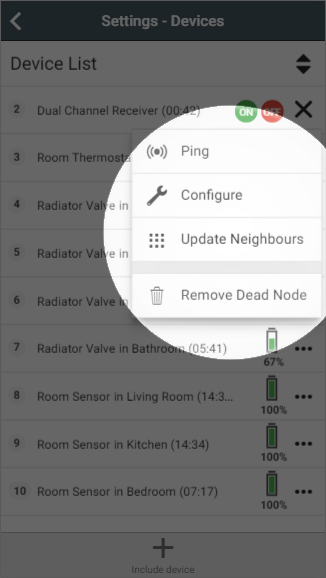
If the device does not say 5°C, click on the device submenu (•••) in the app and choose 'Configure'.
-
Confirm that you want to proceed by pressing 'Configure'.
-
Now click on the device submenu (•••) and choose 'Ping' and confirm this.
-
Wake up the Wireless Radiator Valve by pressing the button underneath the screen.
-
The time since last communication should return to near 00:00 and the setpoint should say 5°C.
-
If the setpoint still does not update, see this article for re-adding the Wireless Radiator Valve to your system.
-
-
Return to the My House page, and select the radiator zone once more.
-
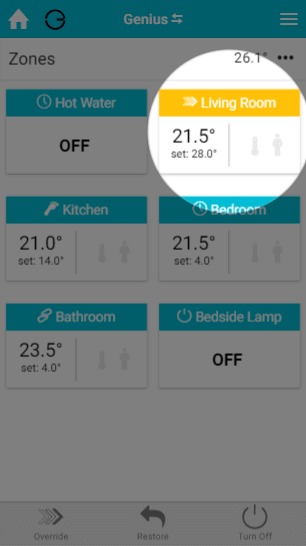
Override it to '28°C'.
-
The heating indicator for this zone should turn orange.
-
Click on the Main Menu.
-
Select 'Settings'.
-
Choose 'Devices'.
-
-
Locate your Wireless Radiator Valve for this zone and click on the row to expand it. The setpoint should say 28°C.
-
If it displays an arrow to 28°C, you will need to wake up the Wireless Radiator Valve by pressing the button underneath the screen once. The time since last communication should return to near 00:00 and the setpoint should update.
-
-
The Wireless Radiator Valve should now show 28°C on the screen if you wake it up.
-
If the device does not say 28°C, click on the device submenu (•••) in the app and choose 'Configure'.
-
Confirm that you want to proceed by pressing 'Configure'.
-
Now click on the device submenu (•••) and choose 'Ping' and confirm this.
-
Wake up the Wireless Radiator Valve by pressing the button underneath the screen.
-
The time since last communication should return to near 00:00 and the setpoint should say 28°C.
-
If the setpoint still does not update, see this article for re-adding the Wireless Radiator Valve to your system.
-
The fact that the Wireless Radiator Valve displays 28°C on the device and app shows that it is communicating correctly.
-
Confirming the Wireless Radiator Valve can open/shut off the flow of water
-
With the radiator zone overridden to 28°C, the zone orange in the app and the boiler running, hot water should now start to flow around the system.
-
Wait 10 minutes, then go to the radiator in question and press the button underneath the screen. You should see 28°C on the screen of the device.
-
Gently try to rock the Wireless Radiator Valve. The device should not feel tight on the radiator.
-
If it moves freely, the Wireless Radiator Valve has fully retracted the plunger and in turn the pin is now free to let water pass. This shows that the Wireless Radiator Valve is working correctly.
-
If the Wireless Radiator Valve has no movement at all, press the button underneath the screen once more and wait 10 minutes. It is possible the valve was asleep and has not had time to open yet.
-
-
The radiator nearest the Wireless Radiator Valve (and the pipe beneath) should now start to heat up.
-
Be careful when checking the radiator as it may be very hot and burn if due care is not taken.
-
If the Wireless Radiator Valve moves freely but the radiator is not heating up, either the hot water has not been pumped this far from the boiler, in which case waiting a few minutes longer will fix this; or the pin in the valve body underneath the Wireless Radiator Valve has seized.
-
If the radiator is still not heating up, the seized pin will have to be freed or the valve body replaced. To try to free the pin, remove the valve head from the radiator, and with a pair of pliers or end of a large spanner, gently work the pin on the valve body free. Be careful when doing this as if the valve body is in poor condition, it may cause the valve body to leak. Once the pin is free, remount the valve head. See this link for removing and remounting the Wireless Radiator Valve. If it's not possible to free up the pin on the valve body, it will need to be replaced.
-
Genius Radiator Valve (older model - DA-WRV-C)
How to test
Confirming the Genius Radiator Valve is communicating
-
Load up the My House page of the app.
-
Check to see if there are any errors reported in the 'System' tile at the top of the screen.
-
If so, look for the Genius Radiator Valve for this zone.
-
If there is an error with this device, click on the error to be guided through how to fix it.
-
-
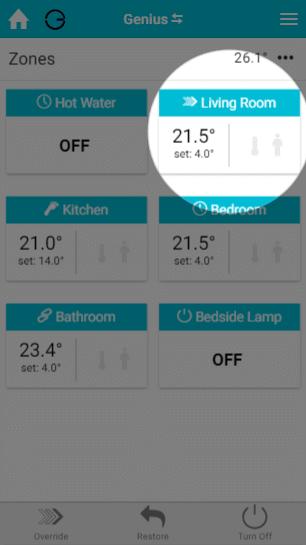
If there are no errors, go to the radiator zone and override it to '4°C'.
-
This should be a significant amount below the set temperature.
-
-
The heating indicator for this zone should turn blue.
-
Click on the Main Menu.
-
Select 'Settings'.
-
Choose 'Devices'.
-
-
Locate your Genius Radiator Valve for this zone and click on the row to expand it. The setpoint should say 4°C.
-
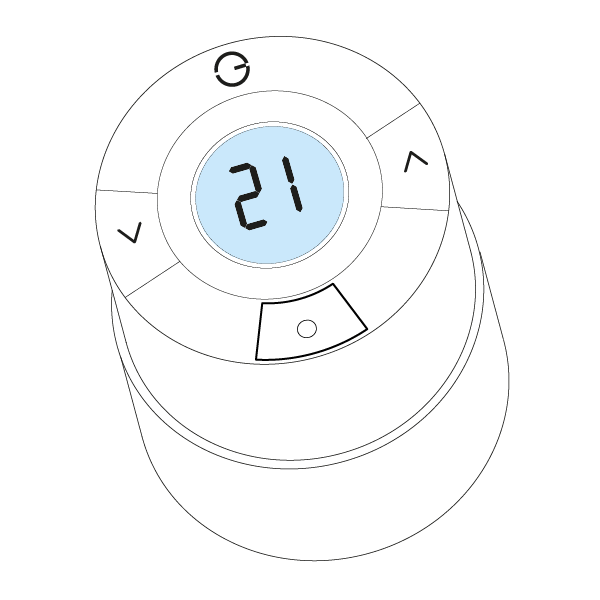
If it displays an arrow to 4°C, you will need to wake up the Genius Radiator Valve by pressing the right (^) button once. The time since last communication should return to near 00:00 and the setpoint should update.
-
-
The Genius Radiator Valve should now show 4°C on the screen if you wake it up.
-
If the screen is blank, check or replace the batteries. The Genius Radiator Valve takes 2 x AA batteries.
-
If the device does not say 4°C, click on the device submenu (•••) in the app and choose 'Configure'.
-
Confirm that you want to proceed by pressing 'Configure'.
-
Now click on the device submenu (•••) and choose 'Ping' and confirm this.
-
Wake up the Genius Radiator Valve by pressing the right (^) button.
-
The time since last communication should return to near 00:00 and the setpoint should say 4°C.
-
If the setpoint still does not update, see this article for re-adding the Genius Radiator Valve to your system.
-
-
Return to the My House page, and select the radiator zone once more.
-
Override it to '28°C'.
-
The heating indicator for this zone should turn orange.
-
Click on the Main Menu.
-
Select 'Settings'.
-
Choose 'Devices'.
-
-
Locate your Genius Radiator Valve for this zone and click on the row to expand it. The setpoint should say 28°C.
-
If it displays an arrow to 28°C, you will need to wake up the Genius Radiator Valve by pressing the right (^) button once. The time since last communication should return to near 00:00 and the setpoint should update.
-
-
The Genius Radiator Valve should now show 28°C on the screen if you wake it up.
-
If the device does not say 28°C, click on the device submenu (•••) in the app and choose 'Configure'.
-
Confirm that you want to proceed by pressing 'Configure'.
-
Now click on the device submenu (•••) and choose 'Ping' and confirm this.
-
Wake up the Genius Radiator Valve by pressing the right (^) button.
-
The time since last communication should return to near 00:00 and the setpoint should say 28°C.
-
If the setpoint still does not update, see this article for re-adding the Genius Radiator Valve to your system.
-
The fact that the Genius Radiator Valve displays 28°C on the device and app shows that it is communicating correctly.
-
Confirming the Genius Radiator Valve can open/shut off the flow of water
-
With the radiator zone overridden to 28°C, the zone orange in the app and the boiler running, hot water should now start to flow around the system.
-
Wait 10 minutes, then go to the radiator in question and press the right (^) button. You should see 28°C on the screen of the device.
-
Gently try to rotate the Genius Radiator Valve. The head should spin freely, but not leave the radiator.
-
If it spins freely, the Genius Radiator Valve has fully retracted the plunger and in turn the pin is now free to let water pass. This shows that the Genius Radiator Valve is working correctly.
-
If the Genius Radiator Valve is not turning freely, press the right (^) button once more and wait 10 minutes. It is possible the valve was asleep and has not had time to open yet.
-
-
The radiator nearest the Genius Radiator Valve (and the pipe beneath) should now start to heat up.
-
Be careful when checking the radiator as it may be very hot and burn if due care is not taken.
-
If the Genius Radiator Valve is turning easily but the radiator is not heating up, either the hot water has not been pumped this far from the boiler, in which case waiting a few minutes longer will fix this; or the pin in the valve body underneath the Genius Radiator Valve has seized.
-
If the radiator is still not heating up, the seized pin will have to be freed or the valve body replaced. To try to free the pin, remove the valve head from the radiator, and with a pair of pliers or end of a large spanner, gently work the pin on the valve body free. Be careful when doing this as if the valve body is in poor condition, it may cause the valve body to leak. Once the pin is free, remount the valve head. See this link for removing and remounting the Genius Radiator Valve. If it's not possible to free up the pin on the valve body, it will need to be replaced.
-
More information
-
Now that you have proven that the Radiator Valve can control the radiator, you may want to see this article which explains using an offset to ensure that the Wireless Radiator Valve or Genius Radiator Valve can control the radiator accurately.
-
Alternatively, see this article for ensuring that the Boiler Controller is set up correctly.