
The Devices page shows the status of the devices on your system, gives more detailed information about each one, and has some options for fixing problems.
|
Demonstration |
|---|
|
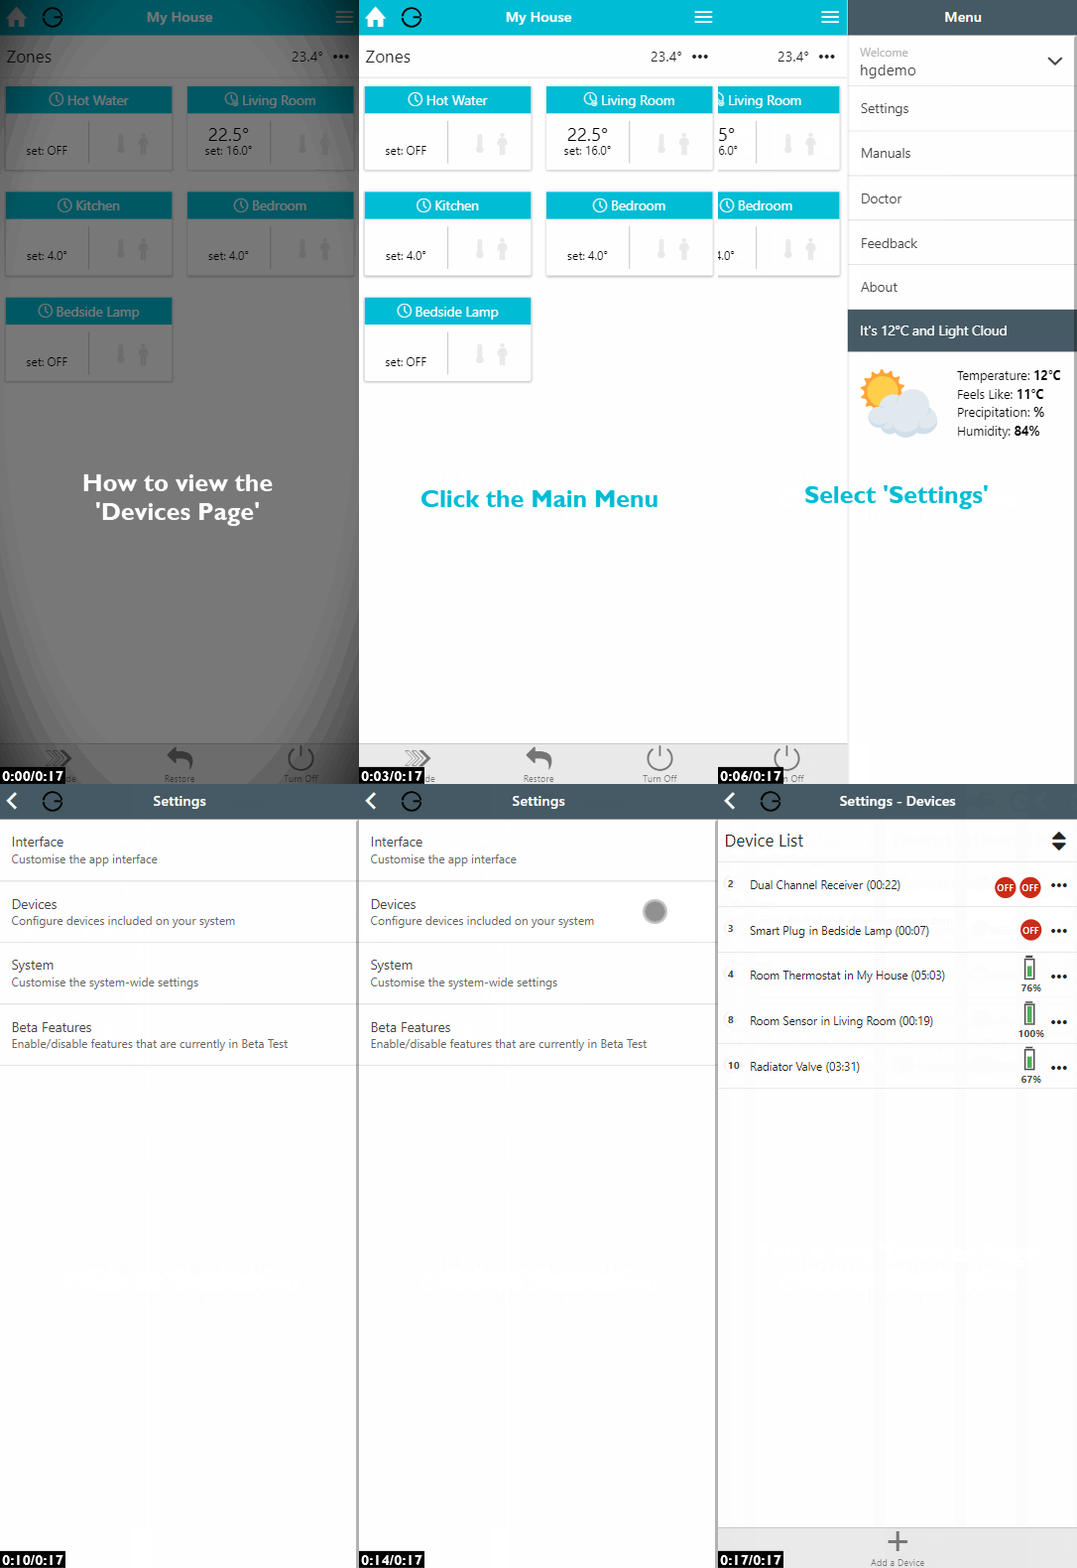
To reach the Devices page:
-
Click on the Main Menu in the top right-hand corner.
-
Click on Settings.
-
Click on Devices.
Understanding the summary
Device List
Each of your devices is listed, along with the zone it is assigned to and the time since it last communicated.
-
Device ID: Each device is given a unique number so it can be identified on the system.
-
Device Summary: The type of device, such as Wireless Radiator Valve or Room Sensor, along with the zone it is assigned to.
-
Time since last communication: All devices communicate wirelessly with the system, but battery-powered and mains-powered devices communicate differently.
A battery-powered device is asleep most of the time to save its battery. It wakes up at regular intervals to check for any queued messages. For the wake-up interval of each device, see Device communication time.
A mains-powered device receives messages as soon as they are queued, but does not communicate regularly. So if no action is needed for a mains-powered device, the time since last communication can be many hours.
For more information, see How to test the signal strength.
Icons
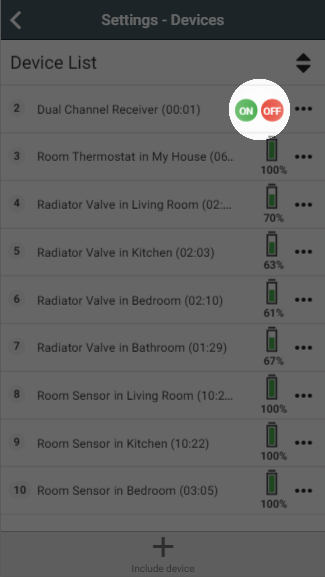
The current state of each switch is shown as a dot: green means the switch is on, and red means it is off.
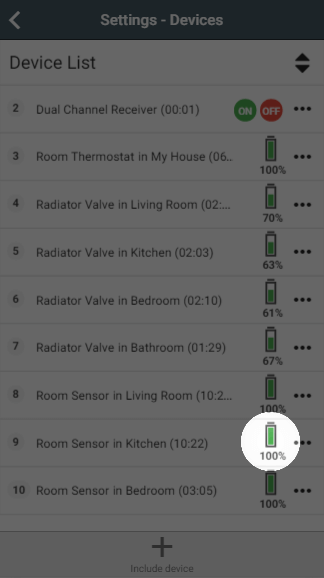
The current battery level of battery-powered devices is also shown, with the icon changing colour as the battery drains.
On tablets and computers, a second icon shows the measured temperature from any devices that measure it. This appears to the left of the battery icon.
Sorting the list
|
Demonstration |
|---|
|
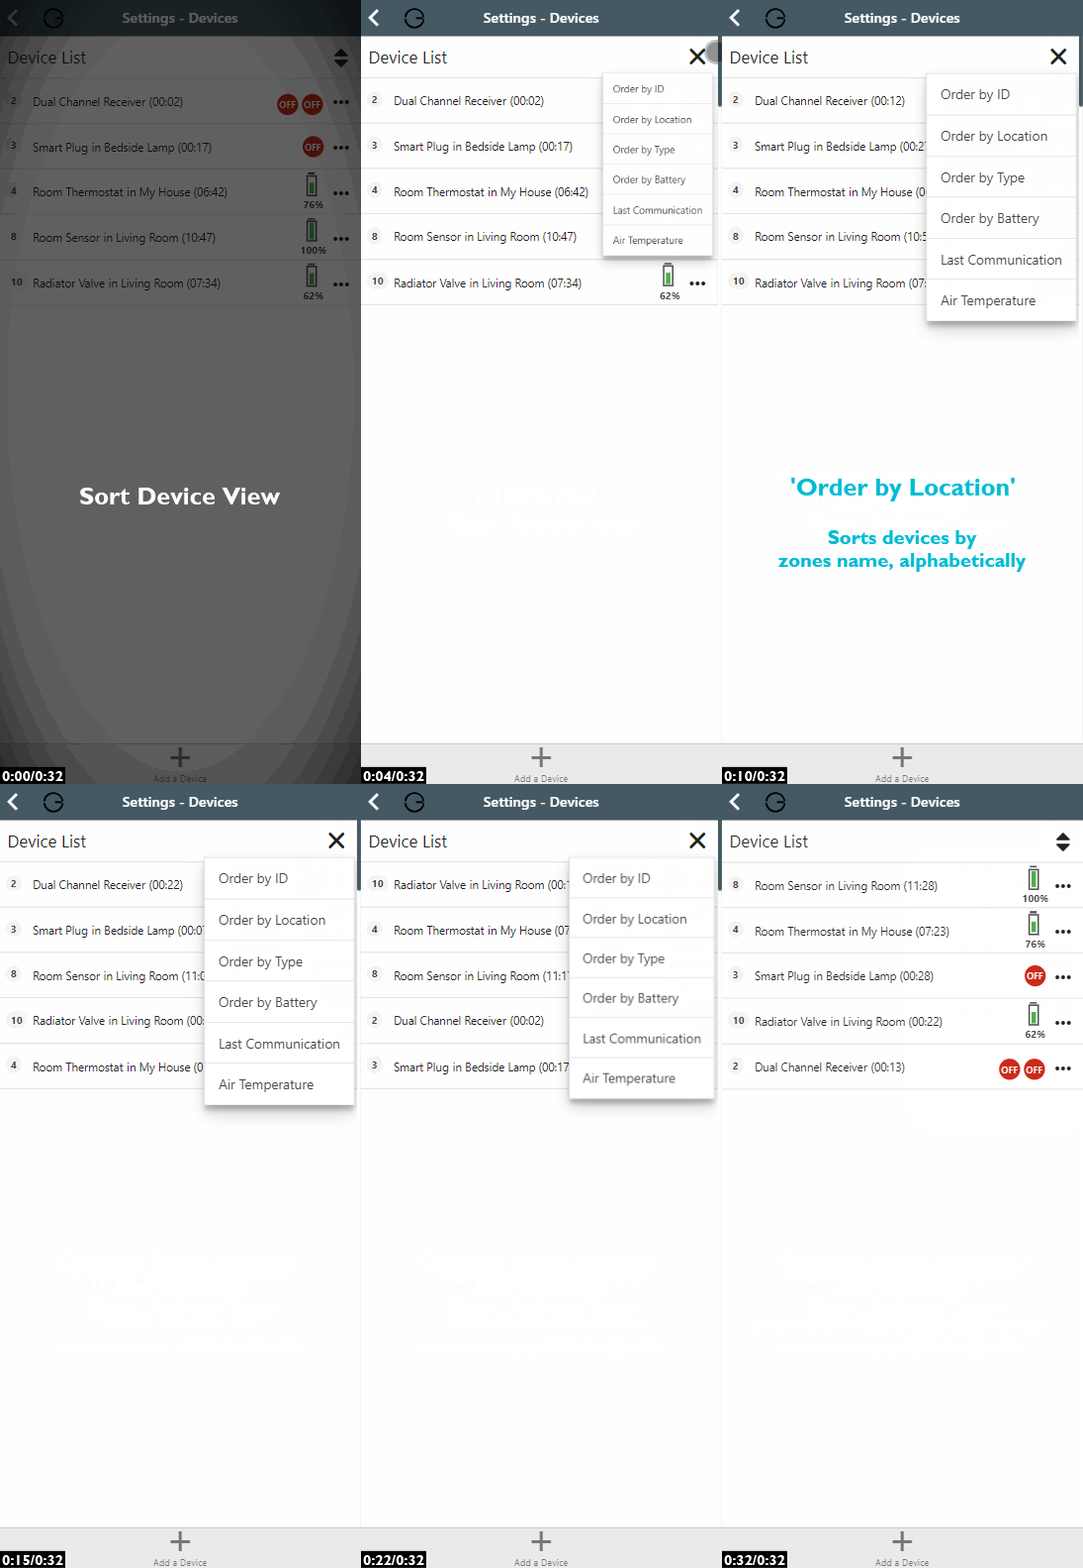
You will often visit the Devices page with a specific task in mind, such as checking whether any devices have low batteries, or checking all devices of one type (e.g. Room Sensors). You can re-order the list by clicking on the re-order icon at the top-right of the page, which shows these options:
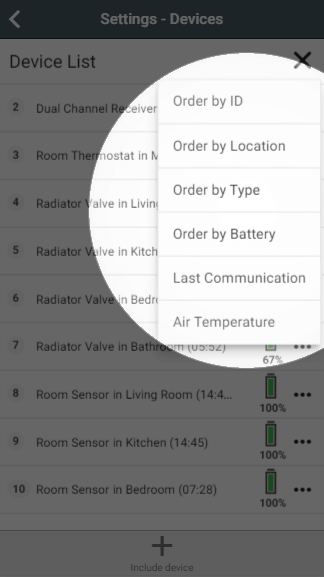
Order by:
-
ID: The default option. Devices are sorted by the ID number shown on the left-hand side of each row.
-
Location: Devices are sorted by the zone they are assigned to. Devices that have not been assigned to a zone appear at the top of the list.
-
Type: Devices are grouped by type, so all of the Wireless Radiator Valves, Room Sensors etc. are displayed together.
-
Battery: Battery-powered devices with the lowest battery level are shown at the top of the list, with mains-powered devices at the bottom.
-
Last Communication: The devices the Genius Hub has not communicated with for the longest are shown at the top of the list. For more information on communication times, see Device communication time.
-
Air Temperature: Devices that measure temperature are shown first, starting with the device measuring the lowest temperature.
Quick Action
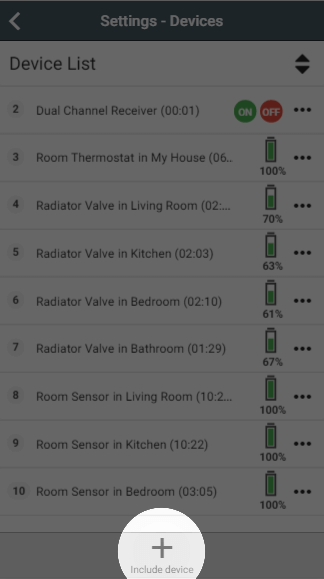
To add extra devices to your system, click on the 'Include device' button in the Quick Actions bar at the bottom of the page. This will take you to the Doctor, which will guide you through adding the device. For more information, see the 'Adding new devices' chapter.
Sub-menu
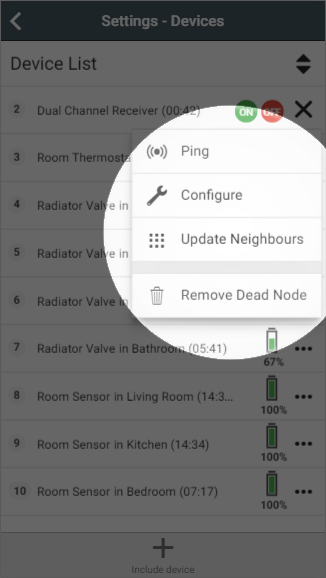
Each device has a sub-menu with a number of actions you can carry out.
-
Ping: The Genius Hub attempts to communicate with the device. For mains-powered devices, the time since last communication will drop to near 00:00 if the ping is successful. Battery-powered devices need to be woken up at the same time as they are pinged, which you can do by pressing a button on the device.
-
Configure: Re-sends all of the settings to the device, such as how often it should wake up, that it reports in Celsius, or how sensitive its motion detection is. The settings are updated the next time the device communicates; for battery-powered devices this may take up to an hour, depending on how many settings are being checked and updated.
-
Update Neighbours: Mains-powered devices also act as signal boosters, collecting messages from nearby battery-powered devices and re-transmitting them. If a device is not communicating, you can run Update Neighbours on a nearby mains-powered device to improve the communications network.
-
Remove Dead Node: Removes a device from the Genius Hub when it is no longer needed, for example if a radiator has been removed from the property, or a device has reset itself and been added back onto the Genius Hub, leaving an old 'ghost' entry behind.
To remove a dead node:
-
Remove the device from any zones it is assigned to (in each zone's Zone Setup).
-
Power off the device.
-
Ping the device (as described above) to confirm the Genius Hub can no longer communicate with it.
-
Click on 'Remove Dead Node'.
Device Details
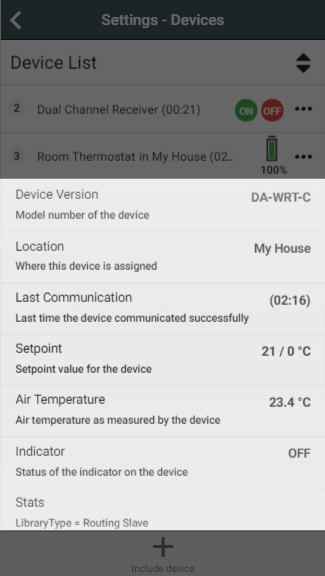
If you click on the name of any device, its row will expand to show the device's current details. Many of these are the same as in the summary, but some extra details may also be shown:
-
Device Version: The model number of the device, which can help with troubleshooting if there is a problem with the device.
-
Setpoint: The temperature the device is controlling to, e.g. the temperature the Wireless Radiator Valve will control the zone to.
-
Air Temperature: The current temperature measured by the device.
-
Relay Switch: Whether the switch in the device is on, such as whether the Smart Plug's socket is active, or whether the Single Channel Receiver is calling for heat.
-
Valve Hidden Offset: Adjusts the temperature the Wireless Radiator Valve controls to. For more information, see the section below.
-
Stats: Technical information about the device, which can be used for troubleshooting.
Details such as Setpoint are often shown in the format: 14 -> 16 °C
The first value is the current value reported by the device, and the second is the pending value waiting to be sent by the Genius Hub. Most of the time both values are the same, because the device has already received its setting from the Genius Hub, and in that case only one value is shown. If the setpoint has recently changed (e.g. at the start of a heating period), the first value will show the old setpoint and the second will show the new one.
When controlling the hot press (hot water tank) in Irish systems, the Wireless Radiator Valves may show FO (fully open) or FC (fully closed), both on the Devices page and on the device's screen. This shows that the valves are no longer controlling to the temperature they measure, and are instead being controlled solely by the Genius Hub. The buttons on the device are disabled while it is in this mode.
Wireless Radiator Valve
Valve Hidden Offset
In zones with multiple Wireless Radiator Valves, or a Wireless Radiator Valve and a Room Sensor, the devices may not read the same temperature. This is because the Room Sensor is placed in a sensible location (e.g. chest height on an internal wall), whereas the valve is likely to be near the floor, under a window or behind furniture. If the valve is misreading the temperature, you can adjust it using the hidden offset.
It is called a hidden offset because the valve continues to show the same setpoint on its screen as the app, but adjusts the setpoint internally.
The Valve Hidden Offset adjusts a single valve. To offset the temperature for a whole zone instead, use the 'Temperature offset' setting in Zone Setup. See the 'Setup pages' chapter.
To adjust the Valve Hidden Offset for a Wireless Radiator Valve:
-
Find the number of the valve in the relevant Zone Setup.
-
From the My House page, click on the Main Menu.
-
Click on Settings, then Devices.
-
Select the valve from the list.
-
If the valve needs to control to a higher temperature to match the temperature measured by the Room Sensor, set a positive Valve Offset. If it needs to control to a lower temperature, set a negative Valve Offset.
For more information, see Genius Radiator Valve Offset Temperature.
Valve Responsiveness
If a Wireless Radiator Valve is fitted to a radiator that is over-sized for the room, the radiator can heat up too quickly for accurate control. In this case, the valve can be 'slowed down' so the heating does not overshoot the set temperature.
To adjust the Valve Responsiveness for a Wireless Radiator Valve:
-
Find the number of the valve in the relevant Zone Setup.
-
From the My House page, click on the Main Menu.
-
Click on Settings, then Devices.
-
Select the valve from the list.
-
The default value is '1', which is the fastest response. To slow down the heating of the radiator, move the slider to the right to a higher value. We recommend moving the slider a couple of steps at a time and monitoring the results over the next few days.
Valve Orientation
With our new Wireless Radiator Valves (DA-WRV-E), the orientation of the valve is very important. This was not the case for the previous valves (DA-WRV-A, B and C). In the UK, the standard and most common orientation is vertical, at the bottom of the radiator. In this orientation, the part you turn to adjust the temperature is at the top of the valve, and the button with a dot on it (used to mount the valve) is below the screen that displays the target temperature.
If your Wireless Radiator Valve is installed horizontally (or upside down under a radiator), it will under-read the temperature in the room. This is because it compensates for heat coming from the pipework and radiator when it should not, which can cause the room to overheat.
To correct the orientation setting of a Wireless Radiator Valve:
-
From the My House page, click on the Main Menu, then 'Settings'.
-
Select 'Devices'.
-
Select the Wireless Radiator Valve in the zone you want to adjust.
-
Set the 'Valve orientation' toggle to 'Horizontal'.
Bypass Valve Learning
The 'Bypass Valve Learning' setting tells the Wireless Radiator Valve (DA-WRV-E) to treat changes from the app as if they were manual overrides.
This should make the valve more responsive, especially when the set temperature is first changed. Temperature control after the initial heat-up will be just as accurate, but the valve will appear to respond faster to changes in the setpoint.
To enable 'Bypass Valve Learning':
-
From the My House page, click on the Main Menu.
-
Select 'Settings', then 'Devices'.
-
Scroll to the Wireless Radiator Valve that is slow to heat the radiator and click on it.
-
In the expanded options (grey background), find the 'Bypass Valve Learning' setting. This is disabled by default. Click the toggle to enable it (it will turn green).
From then on, all commands from the app will be treated as manual overrides, and the valve will not use its built-in algorithm or learning during the heat-up. It will still maintain a stable temperature in the room after the initial heat-up.
Powered Room Thermostat
Temperature Offset
In some installations the Powered Room Thermostat can misread the temperature (for example, when fitted in a hollow wall in a flat, it may detect the temperature behind the wall rather than in the room). If this happens, you can adjust its reading using the offset slider.
To adjust the Temperature Offset for a Powered Room Thermostat:
-
Find the number of the Powered Room Thermostat in the relevant Zone Setup.
-
From the My House page, click on the Main Menu.
-
Click on Settings, then Devices.
-
Select the Powered Room Thermostat from the list.
-
If the thermostat needs to control to a higher temperature, set a positive offset. If it needs to control to a lower temperature, set a negative offset.
Screen Brightness
The screen brightness of the Powered Room Thermostat can be adjusted to suit the room it is in. In a conservatory or a room with bright sunlight, the screen may need a high brightness to be seen clearly. In a bedroom, you will probably want to turn it down, or even off when it is not being used. The setting controls the brightness while the device is not being used; when a button is pressed, the screen always goes to full brightness.
To adjust the Screen Brightness of the Powered Room Thermostat:
-
Find the number of the Powered Room Thermostat in the relevant Zone Setup.
-
From the My House page, click on the Main Menu.
-
Click on Settings, then Devices.
-
Select the Powered Room Thermostat from the list.
-
To make the screen brighter all the time, increase the percentage. To make it dimmer, set a lower percentage. If it is set to 0%, the screen will be off until a button is pressed.