...
- Navigate to the zone you would like to configure
- Click on the zone sub-menu
- Click on the My House Setup or Zone Setup page
Anchor QuickActions QuickActions
Quick actions
| QuickActions | |
| QuickActions |
The more commonly performed tasks on the setup pages are located on the action bar found at the bottom of the screen.
- Assign device: This action allows you to assign a device, already linked to your system, to the zone you are currently viewing. To assign a device:
- Click on 'Assign device'.
- Find the number of the device you want to assign to the room (this may be printed on a sticker on the device).
Select the correct device and click 'Assign Devices'.
Info Any devices already assigned to another room will not be displayed in this list as a device can only be linked to one zone at a time.
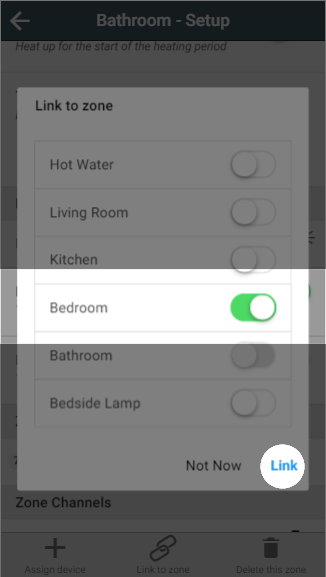
- Link to zone: This links the zone you are viewing to 1 or more other zones. For more information on linking, please see the Linked Mode chapter
- Click on 'Link to zone'.
- Select all of the zones you wish this zone to follow the schedule of.
- Click 'Link'.
- Delete this zone: If you no longer require a zone (for example if you no longer wish to schedule a Smart Plug) you can remove it from the app by clicking this button.
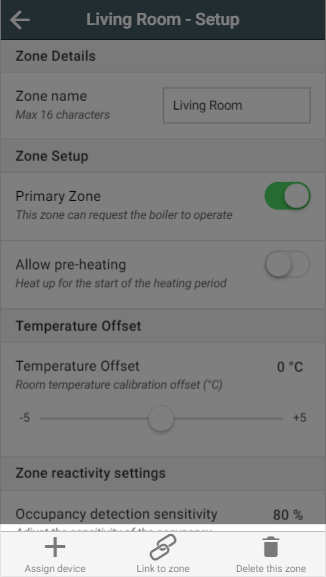
Setup options
| Anchor | ||||
|---|---|---|---|---|
|
If you want to change the name of a zone, just type in the new name in the textbox and the app will update the name on the app. This setting is displayed in all zones except for the My House setup page.
| Anchor | ||||
|---|---|---|---|---|
|
This option determines whether the zone can request the boiler to switch on when it requires heat. The default setting for a zone is for Primary Zone to be enabled.
...
This setting is only displayed in radiator type rooms.
| Anchor | ||||
|---|---|---|---|---|
|
In many of your zones the devices for that zone will have physical controls you can use to adjust the heating, such as the buttons on a Radiator Valve. From the zone setup pages, you can choose whether these buttons should be permitted to affect the heating in the zone, and how they affect the heating. The default setting for a zone is disabled.
...
For more information on manually overriding devices, see the Override Mode chapter. This setting is shown in all zones types, apart from Group Zones.
Pre-heatingAnchor PreHeating PreHeating
The Genius Hub can automatically calculate the pre-heat duration for a chosen room, so that the room will reach the set temperature at the start of the ‘heating period’, rather than just starting to heat up at that time. Your Genius Hub is adaptive, so it's always learning from the temperature recorded by each room sensor. Using the local weather data and the heating history for each room, it will constantly adjust the pre-heat duration as the weather changes. This default setting for pre-heating is disabled.
...
This setting is only displayed in radiator and underfloor zones which have a device which feed the measured temperature back to the app.
Anchor TemperatureOffset TemperatureOffset
Temperature offset
| TemperatureOffset | |
| TemperatureOffset |
In some situations the Radiator Valves and Room Sensors can detect a different temperature to one another, for example if the Room Sensor in placed on an external wall it will misread the temperature due to the cool wall. When this happens and it is not feasible to move the Room Sensor due to the layout of the room, the devices can be manually offset so they read the same temperature.
...
This setting is displayed in radiator and underfloor zones.
Anchor ZoneReactivitySettings ZoneReactivitySettings
Zone reactivity settings
| ZoneReactivitySettings | |
| ZoneReactivitySettings |
For zones with a Room Sensor, you can change the reactivity settings of Footprint mode from here. the 3 changes you can make are:
...
This setting is displayed in any radiator room which has a Room Sensor.
Anchor ZoneDevices ZoneDevices
Zone devices
| ZoneDevices | |
| ZoneDevices |
This shows a list of devices assigned to the room. For example a radiator zone will have 1 or more Radiator Valves and likely a Room Sensor. These will be displayed in the list of devices, along with a button to remove the device.
...
| Info |
|---|
This will only remove the device from the zone, the device will remain linked to your system so it can be assigned to another zone. |
Quick actions
The more commonly performed tasks on the setup pages are located on the action bar found at the bottom of the screen.
...
be |
...
Select the correct device and click 'Assign Devices'.
...
assigned to another |
...
- Click on 'Link to zone'.
- Select all of the zones you wish this zone to follow the schedule of.
- Click 'Link'.
...
zone |
...
. |