From time-to-time you may want to change one of the background settings in a zone, and the setup pages are where you can do this. These pages give you the option to make changes to how the heating works, such as do you want your zones pre-heated, what happens if you press a button on a device in that zone or adjust how sensitive the Room Sensor is to detecting occupancy. The options you can see on the zone setup pages are dependent on the type of zone and which devices are in the zone.
To reach the zone setup pages:
The more commonly performed tasks on the setup pages are located on the action bar found at the bottom of the screen.
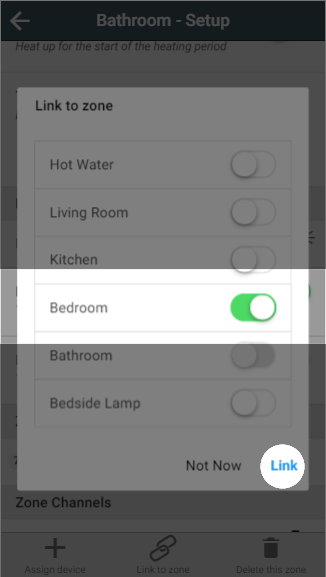
Select the correct device and click 'Assign Devices'.
Any devices already assigned to another room will not be displayed in this list as a device can only be linked to one zone at a time. |
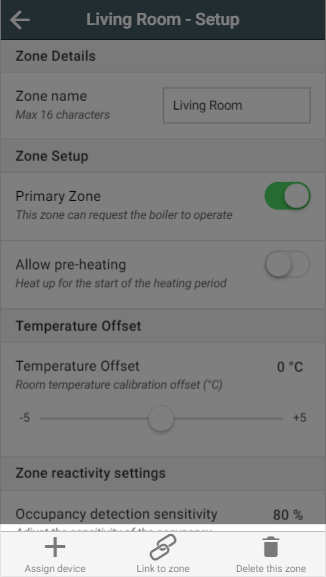
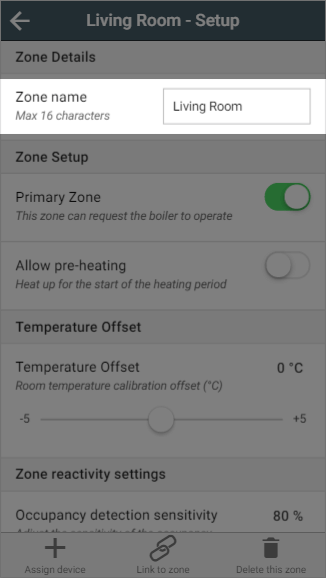
If you want to change the name of a zone, just type in the new name in the textbox and the app will update the name on the app.
In many of your zones the devices for that zone will have physical controls you can use to adjust the heating, such as the buttons on a Radiator Valve. From the zone setup pages, you can choose whether these buttons should be permitted to affect the heating in the zone, and how they affect the heating. The default setting for a zone is disabled.

For more information on manually overriding devices, see the Override Mode chapter.
By default the system has a frost protection temperature of 4°C. This means that it is the minimum temperature which can be set for any mode, in any zone, and will automatically call on the boiler should the measured temperature drop below this point. There are a number of reasons why you might want a higher minimum temperature than this, such as building insurance stipulations, concern over damp or exposed areas of the property not being covered by Genius Hub and so cooling down further than rooms you are controlling.

This slider allows you to increase the frost protection temperature from the minimum of 4°C up to 10°C to 0.5° increments. By increasing this value, the Off mode temperature will change, as will the minimum selectable for all other modes such as Timer and Override.
If you have a schedule which previously had a lower set temperature, the Genius Hub will instead send out the newer, higher, frost protection temperature. |
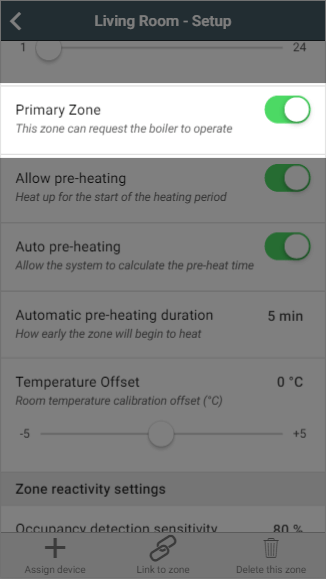
This option determines whether the zone can request the boiler to switch on when it requires heat. The default setting for a zone is for Primary Zone to be enabled.
If this option is disabled, the zone will only heat up if another (Primary) zone is calling for heat at the same time. If only this zone is requesting heat, the boiler will not run and zone will not heat up.
If this option is enabled, the zone will call the boiler to provide heating if this zone requires heat, whether it is only this zone which requires heat or other zones do as well.
| This setting is often useful for a spare bedroom or utility where you may want the zone to heat up if the boiler is already running but you would not want the boiler to heat up just this room. |
When enabled, Genius Radiator Valves in this zone will 4°C whenever the room is not requesting heat to ensure the radiator does not heat up.
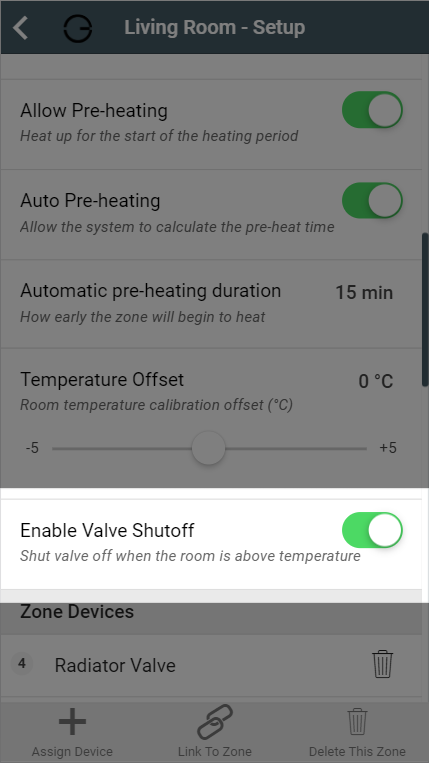
The advantages of sending 4°C to the Genius Radiator Valves when a zone is not heating up, is that the radiator will not take any hot water from the system when the room measured temperature is above the set temperature - in cases when the valve experiences a different temperature to another temperature measuring device in the room, leaving the heated water to those zones which need it most.
The disadvantage is it will reduce battery life as the radiator valve will be running from open to fully closed more often, and it may be confusing to a user as to why the valve shows 4º when this is not part of the heating schedule.
Pre-heating
The Genius Hub can automatically calculate the pre-heat duration for a chosen room, so that the room will reach the set temperature at the start of the ‘heating period’, rather than starting to heat up at that time. Your Genius Hub is adaptive, so it's always learning from the temperature recorded by each temperature sensor. Using the local weather data and the heating history for each room, it will constantly adjust the pre-heat duration as the weather changes. This means that when you look at the automatically calculated time you see a value that is looking at the current measured temperature in the room, the current external temperature and the next heating period target temperature (not the default temperature as this is ignored). When calculating the next pre-heat time it takes into account a number of factors such as the lag time (how long it takes for the heating system to respond after the heating system is started to be heated) and rise rate (which is the speed that the room heats once it has started to rise in temperature). The default setting for pre-heating is disabled.
The Pre-heating options are only available in heating zones which have a temperature measuring device (such as a Genius Radiator Valve, Room Sensor or Room Thermostat) assigned to the zone. |
When pre-heating is disabled, the system will heat the rooms only during heating periods. For example, if you set a heating period between 14:00 and 16:00 the system will start to heat the room at 14:00.
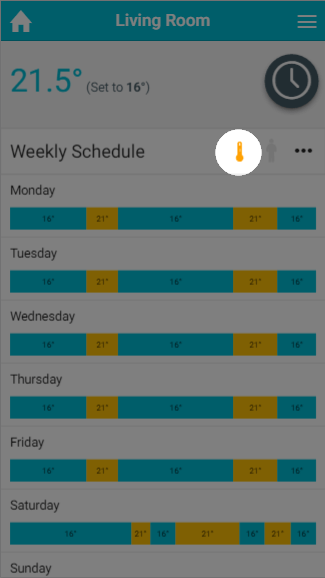
When pre-heating is enabled, the system will start to heat the room before the start of the heating period so the room is up to temperature at the start of the heating period. For example, if you set a heating period between 14:00 and 16:00 the system will start to heat the room at 13:00 so the zone has reached its set temperature at 14:00. When a zone is pre-heating, the set temperature for the zone will be that of the upcoming heating period, not the one currently indicated on the timer bars. To show that that the zone is pre-heating, the pre-heating symbol will be coloured to show why the zone is heating before the heating period has started.
When pre-heating is enabled there are a further 2 options:
Automatic pre-heat: This option allows the Genius Hub to apply its automatically calculated pre-heat time to this zone, given the set temperature, measured temperature and weather conditions. This time is calculated in real time based on the next target temperature in the schedule (bear in mind that the next heating period may be tomorrow). This can be checked on the Zone Setup page at any time. If it reads 5 or 0 minutes this means that the room is up to temperature for the relevant heating period.
If setting a manual pre-heat duration, think about the size of the room as well as how many external walls the room has. A small room will likely heat up more quickly, where as a room on the corner of a property may heat up more slowly due to the amount of walls which are external. |
In some situations the Radiator Valves and Room Sensors can detect a different temperature to one another, for example if the Room Sensor in placed on an external wall it will misread the temperature due to the cool wall. When this happens and it is not feasible to move the Room Sensor due to the layout of the room, the devices can be manually offset so they read the same temperature.

To put an offset into a zone on the app:
If you have a room in which the Room Sensor is misreading the temperature, resulting in the boiler running when the Radiator Valve has closed you, to calculate the offset of this room:
|
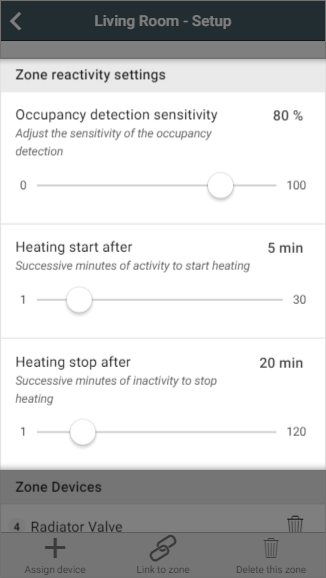
For zones with a Room Sensor, you can change the reactivity settings of Footprint mode from here. the 3 changes you can make are:
Setting this above 90% may result in false triggers being detected. |
With Temperature Hierarchy, you can choose which temperature measuring device in a zone gets priority, or you can allow the system to choose for you.

Each zone that controls to a given temperature (radiator zones, wet underfloor zones, hot water temperature zones) must be able to determine the current temperature in the zone in order to decide whether to heat the zone further.
If there is a single temperature measurement for a zone, then that measurement is used directly. If there are multiple ways to measure the temperature in a zone, then some logic needs to be applied to determine a single temperature value to control to.
When enabled, the system will automatically choose the device in the zone to use when deciding whether to heat the zone. This will be displayed in the 'Current Temperature Devices' section. If you would prefer to manually choose the preferred temperature device, click on the button under 'Preferred Temperature Device' and select the chosen device.
For more information on Temperature Hierarchy, see this article. |
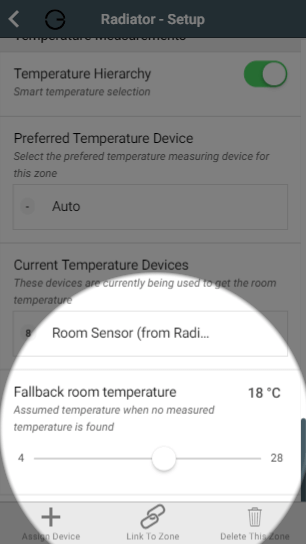
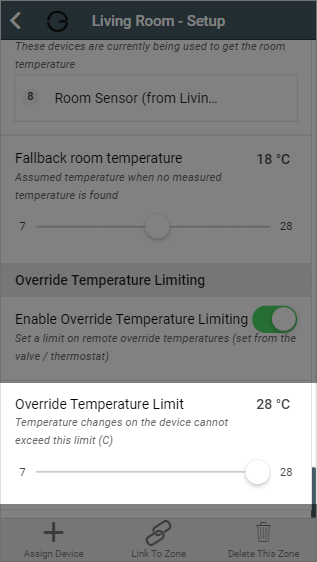
This is the temperature the zone will use to determine whether to bring on the heating, if there is no usable temperature (for example, if all of the batteries for relevant devices had died). When a zone is using the fallback temperature, there will be a warning displayed on the System tile of the My House page, along with errors regarding to any devices with dead batteries.
This shows a list of devices assigned to the room. For example a radiator zone will have 1 or more Radiator Valves and likely a Room Sensor. These will be displayed in the list of devices, along with a button to remove the device.
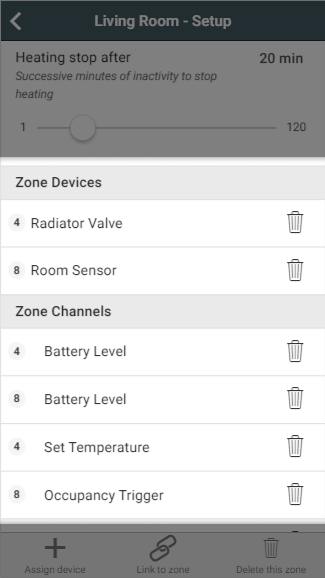
To remove a device from the zone:
Click on the Bin icon next to the device you no longer want assigned to the zone to remove the device from the zone
| This will only remove the device from the zone, the device will remain linked to your system. |
|
The user of the app has full control of the system, however in a number of scenarios you may not want the occupant of the room to have such a broad level of control. This option allows the occupants in the room to trigger the heating outside of the normal heating schedule, but only to a limited upper temperature.
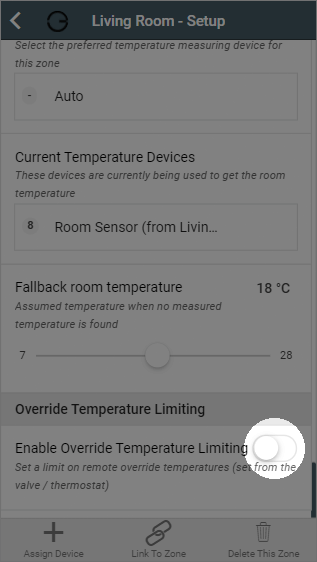
To enable this feature:
Scroll to 'Override Temperature Limiting'