How to test the system
If you cannot log onto your Genius Hub, the following test will show which part of the login process is not working, and how to fix this.
Checking you have the correct credentials
- When you try to log into the app, if you see the error message 'Incorrect username or password', this is due to the username or password being incorrect.
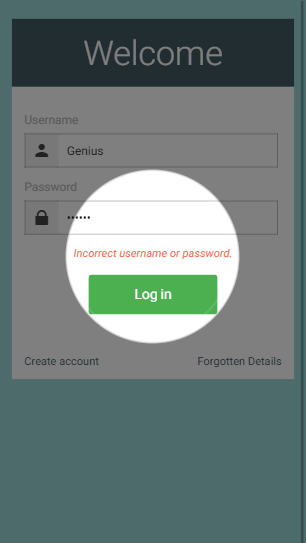
- The easiest way to fix this is clear both the username and password and try again. This is because some devices can auto-capitalise the first letter and so starting again lets you check each letter as you type it in.
- If you are still getting the error message 'Incorrect username or password' click on 'Forgotten Details' to reset the password.
Confirming the device is working
- The first thing to try is logging in from scratch.
- On a mobile device running the app, force-close the app, then re-open it. On Android this can be done by getting all of the apps on screen (normally by pressing the 'square' button), then swiping the Genius Hub app off screen. On iOS double-click the home button so all of the apps appear on screen, then swipe the Genius Hub app off the screen.
- On a web browser, close the tab. Open a new tab and navigate to the app.
- If this works, the app had either stored out of date information, or the device has removed some of the login information from the cache, stopping the device from authenticating with your Genius Hub.
- If you can't log on after starting the app from afresh, try using another device (such as another mobile device with the app, or an 'incognito'/'private' window in the browser) try logging onto your system.
- If you can log in on the second device, then the problem is with your main device.
- For a mobile device running the app, uninstall and re-install the app. This will ensure that you have the latest app, and that there is no remnant data from previously which could interrupt the login process.
For a web-browser, clear the cache and site data for www.geniushub.co.uk and try logging in once more.
Info The app runs in most modern browsers, however it is developed in Google Chrome, and so if you are having problems we recommend you try in this browser.
Ensuring that the internet connection is working
- To ensure that the internet router is working:
- Connect a device (such as a mobile phone) to the Wi-Fi connection in the property and browse the internet.
- If you do not have a working internet connection, we recommend restarting the internet router and waiting until the connection is restored.
Confirming the Genius Hub is powered on & connected
For the HUB-B
- The Genius Hub has 2 cabled connections.
- The first to check is power.
Ensure that the power cable from the back of the Genius Hub is plugged into the power supply provided.
Note Do not use a USB power from the Internet router as these do not output enough power to run the Genius Hub.
- When the power cable is plugged in there should be a red light which turns orange inside the Genius Hub.
The second cable to check is the Ethernet cable. This should be plugged into the Genius Hub at one end and the main internet router at the other, ensuring the internet router is powered on.
Info Whilst the Genius Hub may be using a Powerline Ethernet Adapater or similar most of the time, for this test we recommend using the main router to rule out any local networking problems.
- When the power and Ethernet cables are correctly plugged in. you should see lights appear next to the Ethernet Cable on the Genius Hub.
For the HUB-C
- The Genius Hub has 2 cabled connections.
- The first to check is power.
Ensure that the power cable is fully pushed into the bottom side of the Genius Hub (so that it 'clicks' into position) and that this is also plugged into the power supply provided.
Note Do not use a USB power from the Internet router as these do not output enough power to run the Genius Hub.
- When the power cable is plugged in there should be a single green light on the side of the Genius Hub.
The second cable to check is the Ethernet cable. This should be plugged into the Genius Hub at one end and the main internet router at the other, ensuring the internet router is powered on.
Info Whilst the Genius Hub may be using a Powerline Ethernet Adapater or similar most of the time, for this test we recommend using the main router to rule out any local networking problems.
- When the power and Ethernet cables are correctly plugged in . you should see a second (flashing) green light on the side of the Genius Hub, next to the first one.
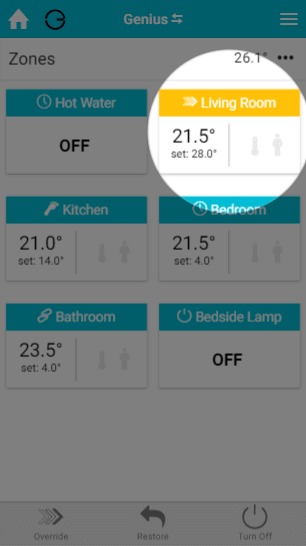
- Load up the My House page of the app.
- Check to see if there are any errors reported in the 'System' tile at the top of the screen.
- If so, look for the Genius Radiator Valve for this zone.
- If there is an error with this device, click on the error to be guided through how to fix it.
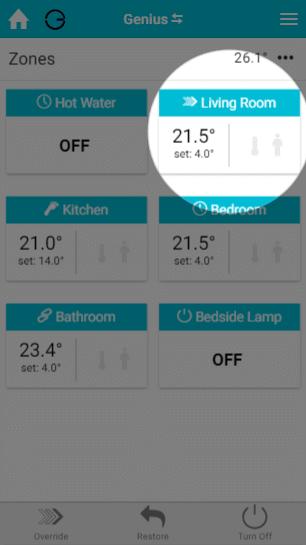
- If there are no errors, go to the radiator zone and override it to '4°C'.
- This should be a significant amount below the set temperature.
- The heating indicator for this zone should turn blue.
- Click on the Main Menu.
- Select 'Settings'.
- Choose 'Devices'.
- Locate your Genius Radiator Valve for this zone and click on the row to expand it. The setpoint should say 4°C.
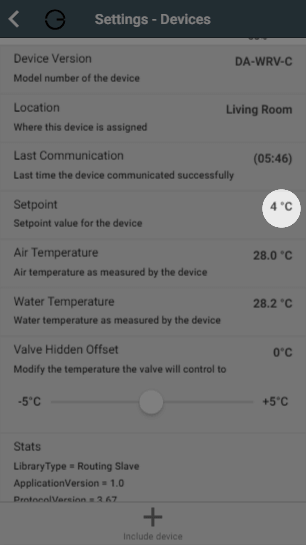
- If it displays an arrow to 4°C, you will need to wake up the Genius Radiator Valve by pressing once on the right )^) button. The time since last communication should return to near 00:00 and the setpoint should update.
- The Genius Radiator Valve should now show 4°C on the screen if you wake it up.
- If the device does not say 4°C, click on the device submenu (•••) in the app and choose 'Configure'.
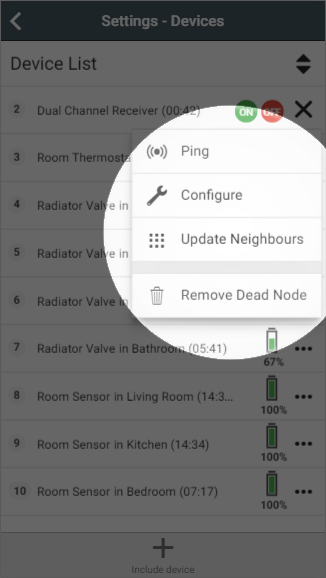
- Confirm that you want to proceed by pressing 'Configure'.
- Now click on the device submenu (•••) and choose 'Ping' and confirm this.
- Wake up the Genius Radiator Valve by pressing the right )^) button.
- The time since last communication should return to near 00:00 and the setpoint should say 4°C.
- Return to the My House page, and select the radiator zone once more.
- Override it to '28°C'.
- The heating indicator for this zone should turn orange.
- Click on the Main Menu.
- Select 'Settings'.
- Choose 'Devices'.
- Locate your Genius Radiator Valve for this zone and click on the row to expand it. The setpoint should say 28°C.
setpoint image- If it displays an arrow to 28°C, you will need to wake up the Genius Radiator Valve by pressing once on the right )^) button. The time since last communication should return to near 00:00 and the setpoint should update.
- The Genius Radiator Valve should now show 4°C on the screen if you wake it up.
- If the device does not say 28°C, click on the device submenu (•••) in the app and choose 'Configure'.
- Confirm that you want to proceed by pressing 'Configure'.
- Now click on the device submenu (•••) and choose 'Ping' and confirm this.
- Wake up the Genius Radiator Valve by pressing the right )^) button.
- The time since last communication should return to near 00:00 and the setpoint should say 28°C.
- The fact that the Genius Radiator Valve displays 28°C, on the device and app shows that it is communicating correctly.
Confirming the boiler controller is working
| Info |
|---|
The instructions below are for a Dual Channel Receiver, however your boiler may also be controlled by a Single Channel Receiver. The notes will explain where this differs for testing. |
- The fact that the boiler controller shows a green light, shows that it is communicating and responding correctly.
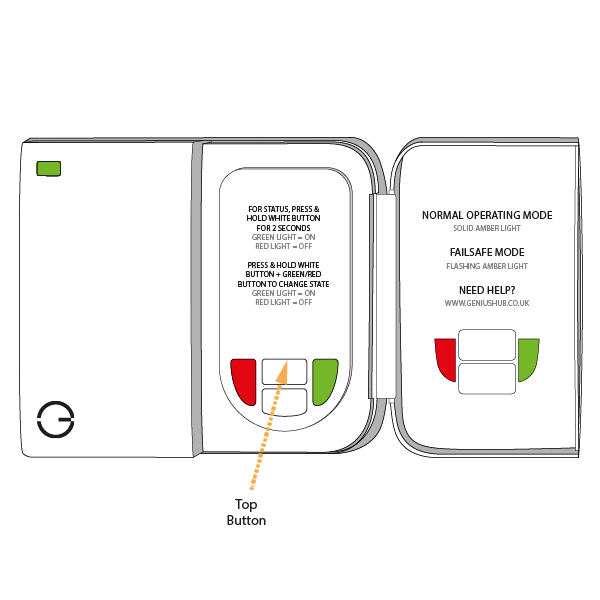
- If the light turns red and you have not configured the Dual Channel Receiver during this testing:
- To fix this, click on the device submenu (•••) and choose 'Configure'.
- Confirm that you want to proceed by pressing 'Configure'.
- Now click on the device submenu (•••) and choose 'Ping' and confirm this.
- The time since last communication should return to near 00:00.
- Press the white button and the light should now turn green. If you have a Single Channel Receiver, the green light should appear now
- To fix this, click on the device submenu (•••) and choose 'Configure'.
- If the light turns red and you have configured the Dual Channel Receiver during this testing:
- See this article for re-adding the Dual Channel Receiver to your system.
- See this article for re-adding the Single Channel Receiver to your system.
- On the side of the zone valve should be a lever.
- When you try to move the lever, if it is:
- Difficult to move, then there is a problem with the zone valve or the wiring between the Dual Channel Receiver and zone valve. You should get a qualified plumber to look at and fix this.
- Easy to move, then there is not a problem with the motor on the zone valve, but there is a problem wiring between zone valve and boiler, or a problem with the boiler. You should get a qualified plumber to look at and fix this. Alternatively, see this article for some common problems with the boiler which may be the cause of the problem.
- In this case, when the light is green, the boiler should fire.
- If the boiler does not fire, the boiler may need to be checked that it has power, suitable water pressure and no error codes on the front of the boiler. You should get a qualified plumber to look at and fix this. Alternatively, see this article for some common problems with the boiler which may be the cause of the problem.
Confirming the Genius Radiator Valve can open/shut off the flow of water
- The Genius Radiator Valve has fully retracted the plunger and in turn the pin is now free for let water pass.
- If the Genius Radiator Valve is not turning freely, press the right )>) button once more and wait 10 minutes. It is possible the valve was asleep and has not had time to open yet.
| Warning |
|---|
Be careful when checking the radiator as it may be very hot and burn if due care is not taken. |
If the Genius Radiator Valve is turning easily but the radiator is not heating up, either the hot water has not been pumped this far from the boiler, in which case waiting a few minutes longer will fix this; or the pin in the valve body underneath the Genius Radiator Valve has seized.
If it's not possible to free up the pin on the valve body, it will need to be replaced.
More information
- Now that you have proven that the Genius Radiator Valve can control the radiator, you may want to see this article which explains using an offset to ensure that the Genius Radiator Valve can control the radiator accurately.
...
Restarting the Genius Hub
- If you can't log on after trying all of the above, restart the Genius Hub & internet router, as described here.
- This will ensure that the Genius Hub is connecting 'as new' to a newly restarted internet router, in case the router has locked out new connections or similar.
...