Versions Compared

Key

  • This line was added.
  • This line was removed.
  • Formatting was changed.

...


Troubleshooting step

Now the Genius Hub needs to get ready to add the device.

Doctor macro placeholder
MacroNamestart-inclusion

On the app tap on Menu, then Settings and then Devices. Now tap on 'Include device' and follow the prompts on the app.

Doctor custom buttons
StartStepIndex1

Troubleshooting step

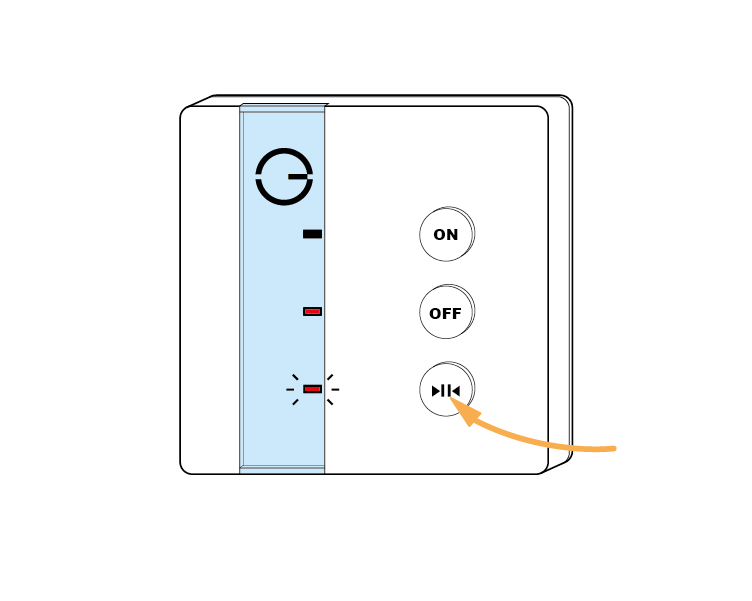
Press & hold the bottom (>||<) button.

The bottom red light stops flashing and the top green light will flash briefly. The 'Off" light turns red when the device has included successfully.

On success, the Single Channel Receiver has been assigned a number, write this number on the side of the device.

Doctor macro placeholder
Optionsdevice-type="scr"
MacroNamevalidate-inclusion

The success or failure of the inclusion will be displayed on the app.

Doctor custom buttons
StartStepIndex1

Troubleshooting step

Now pick a zone to assign the Single Channel Receiver to.


Doctor macro placeholder
Optionsshow-create-new-zone-option allow-user-skip skip-text="Don't assign right now" max="1" filter-on-meta-data="nodeassignable"
MacroNamezone-selector

See Chapter 13 of the Manual for full guidance on assigning the channel to a zone. To create a new zone to assign the device to see step 5 otherwise skip to step 6.

Doctor custom buttons
StartStepIndex3

Troubleshooting step
Doctor macro placeholder
MacroNamecreate-room

See the 'Create new zone' section under Chapter 13 of the Manual for guidance on how to create a new zone.


Doctor custom buttons
StartStepIndex3

Troubleshooting step
Doctor macro placeholder
Optionsnode-index="0"
MacroNameassign-node

To ensure check the device has been correctly assigned open the zone's page, tap "Zone Setup" under the menu and check the channel is listed under "Zone Devices".


Doctor custom buttons
StartStepIndex3

Troubleshooting step

Install the Single Channel Receiver in its final location and wire it accordingly.

Link to Wiring diagram


...