| Solution id |
|---|
| IssueDesc | The Doctor says: The existing Wireless Room Thermostat needs to be included |
|---|
| ID | 16 |
|---|
|
The following explains how to re-add an existing Wireless Room Thermostat to a Genius Hub.
...
| Warning |
|---|
If you have an existing Room Thermostat it will need to be factory reset before it is connected to a Genius Hub. See here for how to factory reset a Room Thermostat. |
...
| Troubleshooting step |
|---|
Make sure that the Room Thermostat is within 2 meters (line of sight) of the Genius Hub (the part that is connected to your Internet router). If the devices are not close enough together, then use the following steps: 1. Carefully remove the Room Thermostat from its backplate by loosening the two screws at the bottom of the backplate. |
...
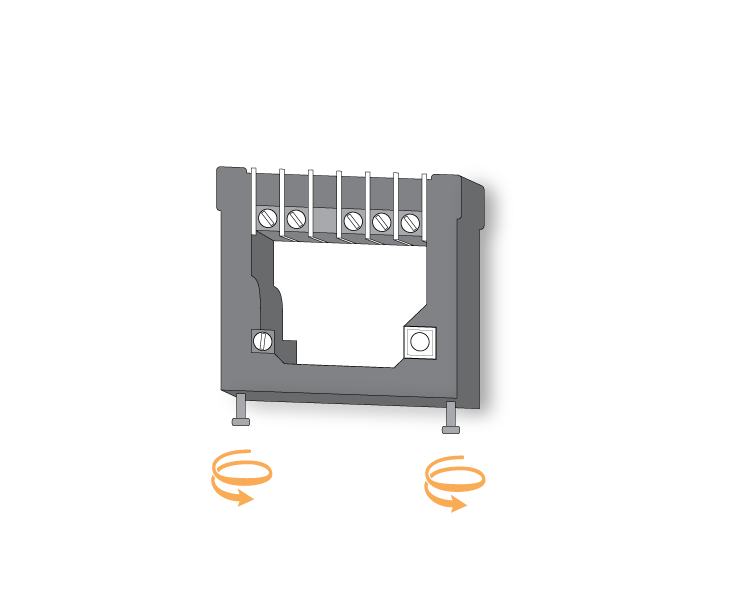 Image Added2. Move the Genius Hub closer to the Room Thermostat. The Genius Hub must have power and an Internet connection. This can be done by: Image Added2. Move the Genius Hub closer to the Room Thermostat. The Genius Hub must have power and an Internet connection. This can be done by:
a) Using a long Ethernet cable
b) Plugging the Hub into a different Ethernet switch
c) Using a Power Line Ethernet adaptor or WiFi booster which has an Ethernet port (see this link for how to connect the hub with a power-line Ethernet adaptor) Ensure there are new batteries in the Room Thermostat. Turn the thermostat over, so the dial is facing away from you and put the number 1 dip switch (left side) into the UP (on) position. |
...
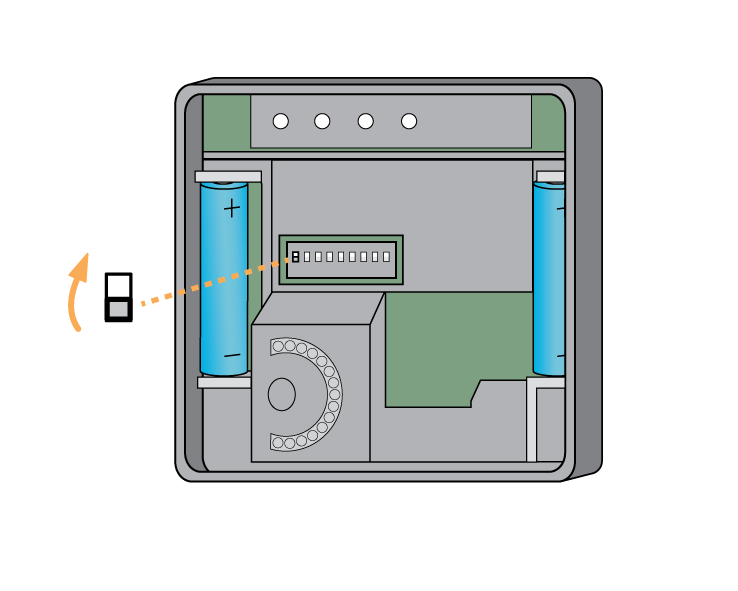 Image Added Image Added
|
| Troubleshooting step |
|---|
Now the hub needs to get ready to add the device. | Doctor macro placeholder |
|---|
| On the app tap on Menu, then Settings and then Devices. Now tap on 'Include device' and follow the prompts on the app. |
|
| Troubleshooting step |
|---|
Turn the thermostat back over so the dial is facing you. Rotate the dial until 'L' is on the screen and press the dial, as a button. 'L' will start to flash. |
...
 Image Added Image Added
After 10 seconds the screen shows 'LP' when the device has included successfully. If 'LP' is not displayed this is not a problem so long as a number for the device is assigned below. |
...
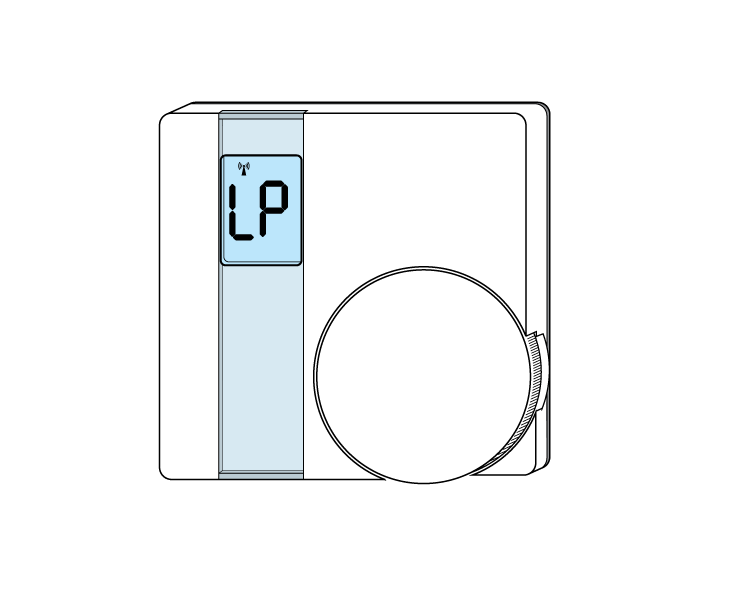 Image Added Image Added
On success, the Room Thermostat has been assigned a number, write this number on the side of the device. | Doctor macro placeholder |
|---|
| Options | device-type="wrt" |
|---|
| MacroName | validate-inclusion |
|---|
| The success or failure of the inclusion will be displayed on the app. |
|
| Troubleshooting step |
|---|
Turn the thermostat over, so the dial is facing away from you and put the number 1 dip switch into the DOWN (off) position. |
...
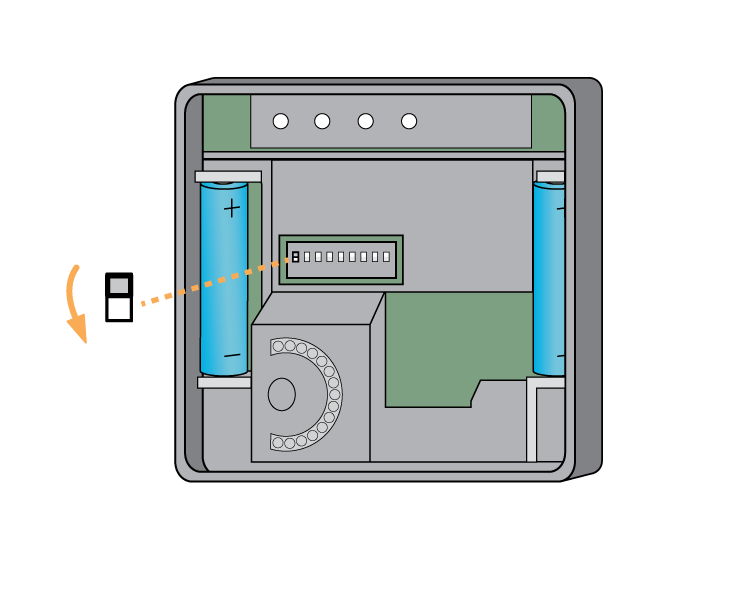 Image Added Image Added
|
| Troubleshooting step |
|---|
Now pick a zone to assign the Room Thermostat to. | Doctor macro placeholder |
|---|
| Options | show-create-new-zone-option allow-user-skip skip-text="Don't assign right now" max="1" filter-on-meta-data="nodeassignable" |
|---|
| MacroName | zone-selector |
|---|
| See Chapter |
|
...
14 of the Manual for full guidance on assigning the channel to a zone. To create a new zone to assign it to see step 5 otherwise skip to step 6. |
|
...
| Troubleshooting step |
|---|
| Doctor macro placeholder |
|---|
| See the 'Create new zone' section under Chapter |
|
...
14 of the Manual for guidance on how to create a new zone. |
|
...
...
| Troubleshooting step |
|---|
| Doctor macro placeholder |
|---|
| Options | node-index="0" |
|---|
| MacroName | assign-node |
|---|
| To ensure check the channel has been correctly assigned open the zone's page, tap "Zone Setup" under the menu and check the channel is listed under "Zone Devices". |
|
...
| Troubleshooting step |
|---|
First locate the Genius Room Thermostat which has been re-added Genius Hub. You need to use the original ID number of the device, and not the one which it currently has. | Doctor macro placeholder |
|---|
| Options | device-type-filter="wrt" max="1" |
|---|
| MacroName | device-selector |
|---|
| The original number of the device may be printed on a sticker on the side of the device |
|
...
...
...
First the Genius Hub needs to attempt to communicate with the Genius Room Thermostat once more. This is to ensure that the device is a 'dead node' and so is eligible to be removed from the system in this way. | Doctor macro placeholder |
|---|
| Options | nodeIndex=0 |
|---|
| MacroName | ping-device |
|---|
| First, ping the device:
Go to the 'Main Menu' and select 'Settings'
Choose 'Devices'
Select the Genius Room Thermostat which you believe to be a dead node
Click on the Device sub-menu (3 dots)
Select Ping and confirm |
Wake up the device by short pressing the top button once.
 Image Added Image Added
|
| Troubleshooting step |
|---|
Now the device is confirmed as no longer on the system, it can be removed. | Doctor macro placeholder |
|---|
| Options | custom-device-address-parameter="deviceAddresses" |
|---|
| MacroName | remove-dead-node |
|---|
|
|
...
To remove the dead node:
Select the Genius Room Thermostat which you believe to be a dead node
Click on the Device sub-menu (3 dots)
Select 'Remove Dead Node' and confirm |
|
...